To create a new event, you can use the "New event" button found in the top-left side of the calendar view, or double-click on an empty field of your calendar content view section.
Event details
When creating a new event, you have to first type a subject (required) and then a location, specifying where the event will take place. You can either create an event that lasts throughout the day, by checking the "All day event" option, or you can specify time limits for the new event. To do so, click the date and time selection boxes for both the start and end date of your event.
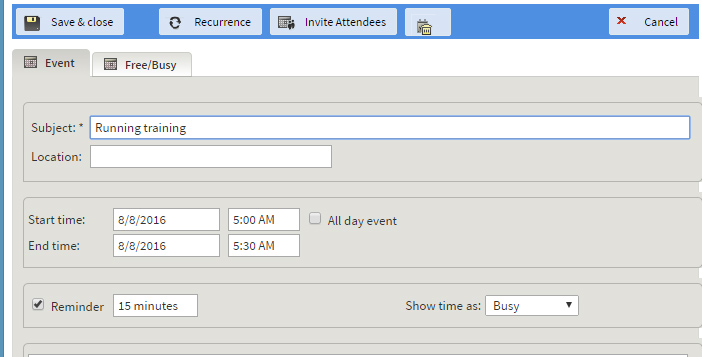
Should you like to be prompted before the start of a certain event, check the "Reminder" box and set your desired time interval. You can also use the available text field to type in any details or explanations regarding your current event. Set the events transparency to "Busy" or "Free" using the drop-down menu in the "Show time as" section. This option will affect the resource availability, displayed in the "Free / Busy" tab. More information is available below on this page.
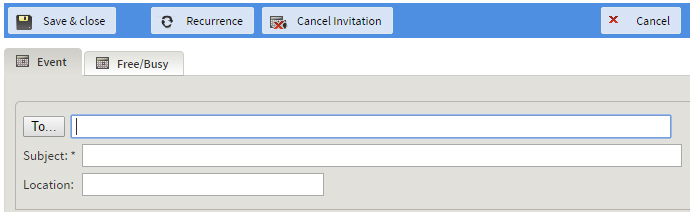
To save your event, press the "Save & Close" button. To abort configuring the event, hit "Cancel".
Adding recurrence
To define a repeating event, hit the "Recurrence" button and configure the desired parameters.
When hitting the "Recurrence" button, a pop-up window will display the available options. You can set a start and end time for the event by clicking the respective selection boxes. Thus, the duration of your event will be automatically set.
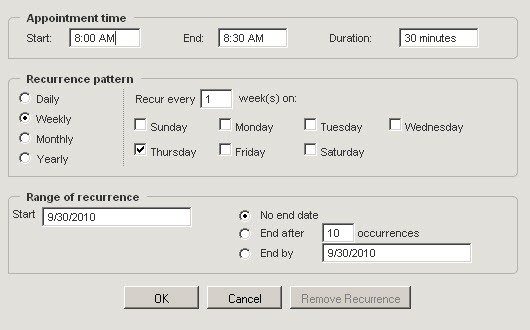
You can set the event to be repeated on a daily, weekly, monthly or yearly basis, according to a defined recurrence pattern. Depending on the recurrence pattern you select, you can access more detailed options:
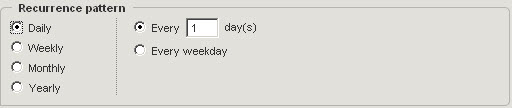
- "Daily" - you can have the event repeated every weekday by checking the corresponding option, Every weekday, or you can have it repeated every 2,3, x days by checking the corresponding option;
- "Weekly" - you can check a certain day (Monday to Sunday) of every 1 / 2 / etc. week(s) for the recurrence;
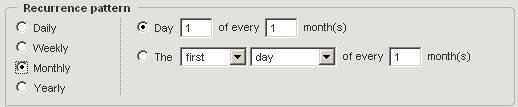
- "Monthly" - you can specify a certain day of every month (e.g. 25th of every month or every 2 months), or select from the other available options: first / second / third / fourth / last - day / weekday / weekend day / Sunday / Monday etc. of every 1 / 2 / etc. months; for example, you can set an event that occurs on the first weekday of every month;
- "Yearly" - you can set the event to occur on a certain date of a certain month (e.g. January 25th) or you can select from the other available options: first / second / third / fourth / last - day / weekday / weekend day / Sunday / Monday etc. of every January / February / etc. months; for example, you can set a seminar attendance event for each first weekend day of every March.
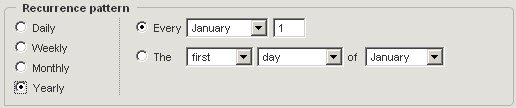
Finally, set the "Range of recurrence" for your event. Click the "Start" selection box to select a date. The event can be repeated incessantly if you choose the "No end date" option. Alternately, you can have it end after a number of instances, by checking the "End after x occurrences" option and setting the desired number of repeats, or set an "End by" date by clicking the related selection box.

When you are done setting the event recurrence, hit "OK". To abort the recurrence, hit "Cancel". For already defined recurrence details, hit "Remove Recurrence" to prevent the event from repeating.
Inviting attendees
Use the "Invite Attendees" button to invite others to attend the event you are creating. When hitting the "Invite Attendees" button, a new text field and a "To" button are added in the upper side of the event editing window. If you want to abort inviting process, press the "Cancel Invitation" button that replaces the initial "Invite Attendees" option.
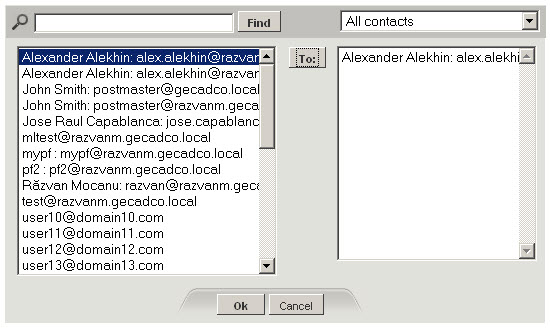
You can either type the email addresses of the persons you want to invite at the event, or you can access your existing contacts by hitting the "To" button. When accessing your contacts using the "To" button, a new pop-up window will appear, allowing you to choose which contacts to invite, as shown below. You can also filter your contacts by type, using one of the available options: "All contacts", "My contacts", "Public contacts" and "Domain contacts".
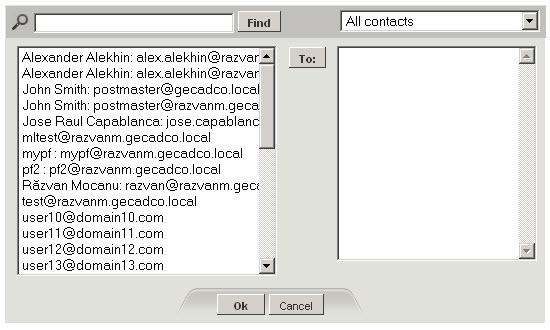
Select the email address(es) of the contact(s) you want to invite with a mouse click, then press the "To" button. To select several contacts, press "Ctrl" on your keyboard. To delete a contact from the list of attendees to be invited, click their email address in the right hand pane and press "Delete" on your keyboard. When you are done selecting attendees, press "OK" to have the email invitations sent to them. To discard the inviting process, hit "Cancel".
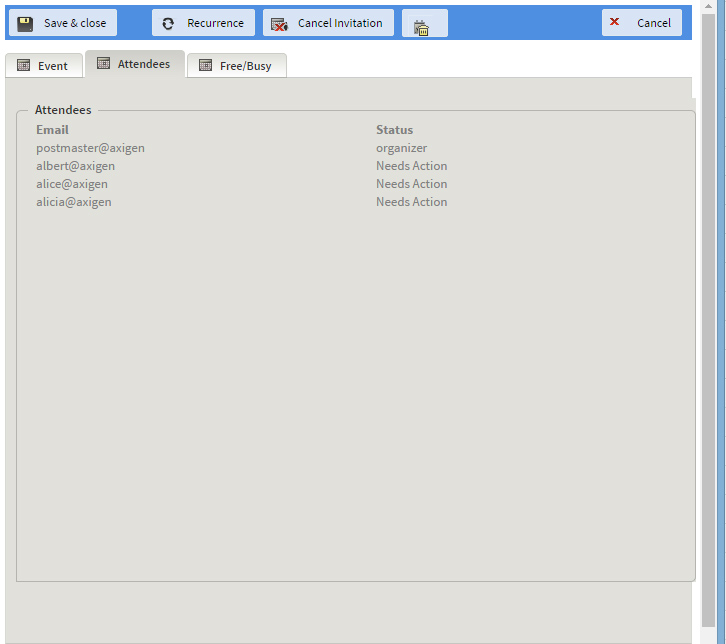
When inviting others to take part in a certain event, the event editing window will also be modified. A new tab called attendees will be added, showing the course of action taken by those invited. The possible statuses are "Organizer", "Accepted", "Declined", "Tentative" and "Needs action".
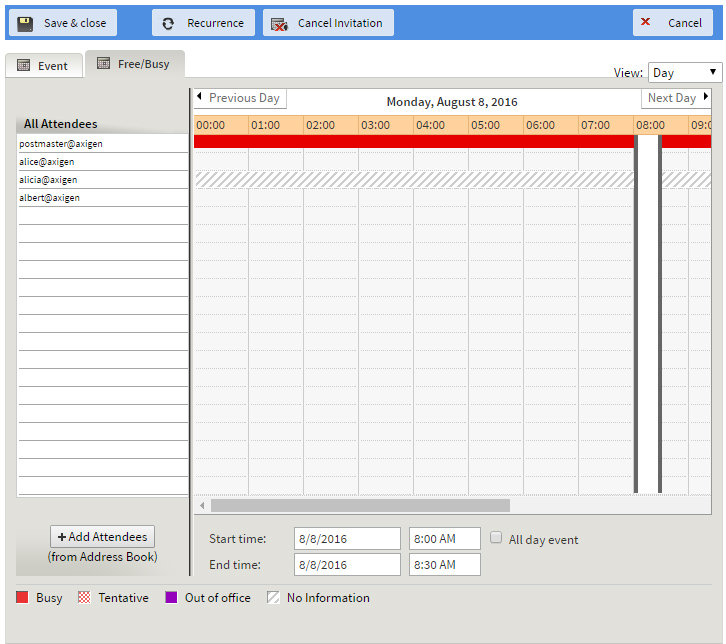
Checking the "Free / Busy" status of the attendees
In the "Free / Busy" tab, the attendee availability is displayed if the user editing the event has the "Read Free / Busy status" permission on the attendee's mailbox.
Reminder options
To be prompted before the start of a certain event, make sure that you check the "Reminder" box when creating / editing an event and set the desired time, before the start of the event, when the reminder pop-up will be shown.
If you have chosen to be reminded of a certain event at the specified time, a pop-up will appear at the given time and date. If no action is taken, it will reappear each time the Standard WebMail interface is automatically refreshed. The time period depends on the refresh settings configured in the "Settings" -> "WebMail Data" page. Alternatively, you can have the reminder postponed using the available snooze options, by choosing a repeat interval in the corresponding drop-down menu and by hitting the "Snooze" button.
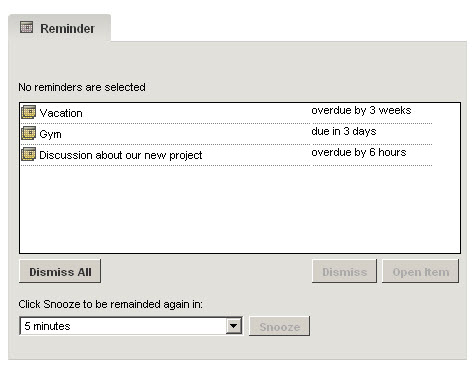
If you want to see the details of an event you are reminded of, press the "Open Item" button. To dismiss a certain event, select it and press the "Dismiss" button. Use the "Dismiss All" button to discard all pending events.
{{Warning|Further settings that determine the calendar behavior need to be set on the "Settings" -> "WebMail Data" page. Each user needs to set the correct "Time Zone" and the "Week start date", in order to have deadlines and start times displayed correctly in their calendar.