Updated: Oct 18, 2022
The Axigen Managed Service Provider (MSP) license lets you create the following types of users:
So, we thought of writing this guide that will help you, our new Axigen Managed Service Provider, in getting started.
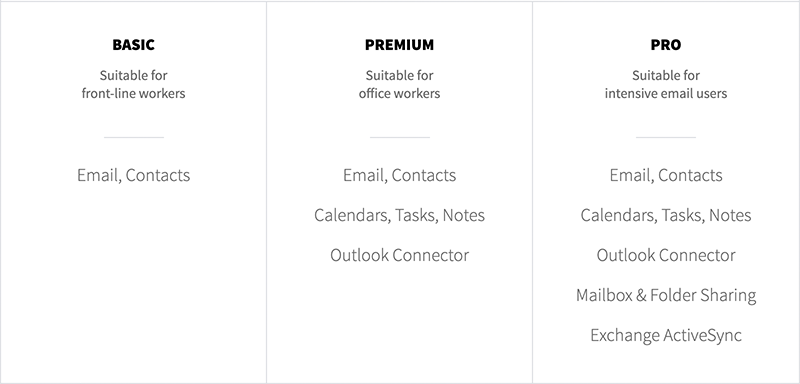
In Axigen’s MSP license, there are three types of users, which can be configured using Account classes — Basic, Premium, and Pro. In today’s article, you’ll see how to create them and how to assign your users to one or the other.

1. How to Create the Account Classes for MSP Users
2. How to Create a New User (Account) in Each Account Class
3. How Can MSPs Modify a User (Account) from an Account Class to Another
4. How to Migrate Accounts from Your Legacy Platform into a Specific Account Class
5. How to Adjust the Number of Provisioned Users per Account Class
6. How to Make Sure Your Usage Statistics Are Enabled
1. How to Create the Account Classes for MSP Users
Following are the steps for our new MSP clients to create account classes in Axigen:
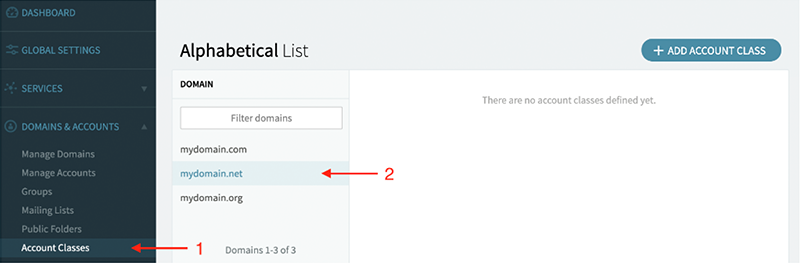
- Navigate to WebAdmin → Domains & Accounts → Account Classes (1) and select the domain for which you want to create the new account classes from the domains list on the left (2)
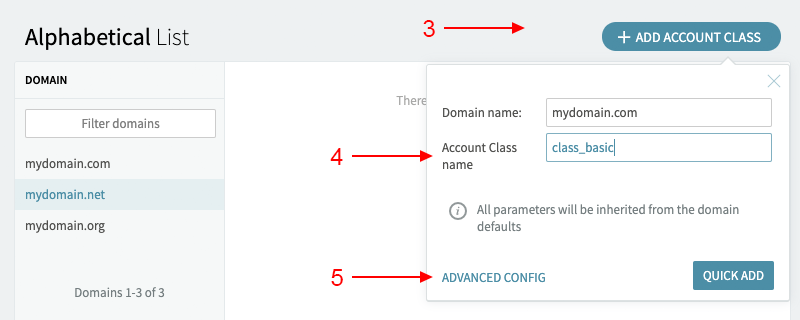
- Press the “Add Account Class“ button (3) and, in the popup that appears, ensure you have the correct domain in “Domain name” and fill in the “Account Class name” field (4)
- press “Advanced Config” (5) and you will be redirected to the “Configure Account Class” screen
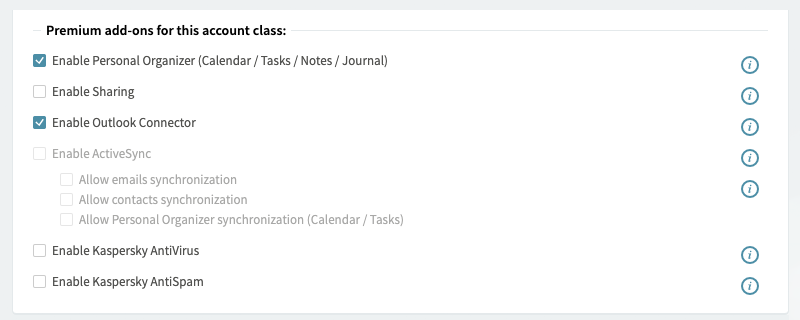
- Go to General → Services → Premium add-ons for this account class and make sure that none of the options pertaining to the premium add-ons are activated for the Basic Account Class
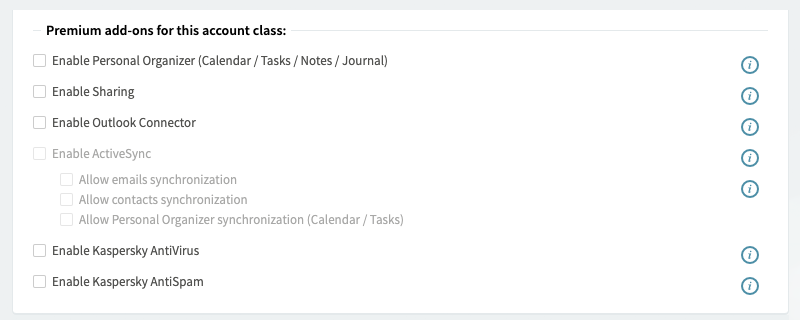
- For the Premium Account Class, activate the following premium add-ons:
- Enable Personal Organizer (Calendar / Tasks / Notes / Journal)
- Enable Outlook Connector
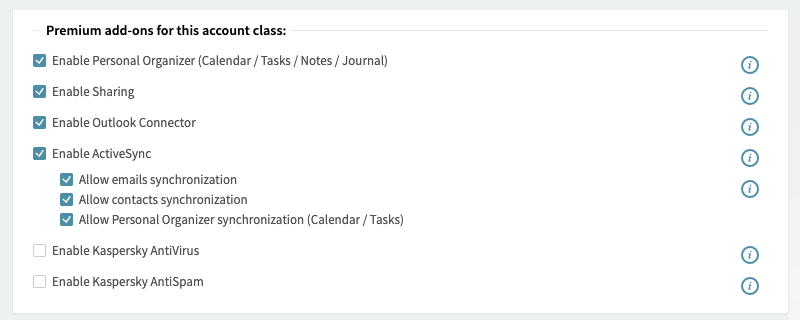
- For the Pro Account Class, activate the following premium add-ons:
- Enable Personal Organizer (Calendar / Tasks / Notes / Journal)
- Enable Sharing
- Enable Outlook Connector
- Enable ActiveSync
- Press “Save Configuration” before exiting the current screen.
2. How to Create a New User (Account) in Each Account Class
Following are the steps for our new MSP clients to create new users (accounts) in each account class in Axigen:
2.1. How to Create New Users with Basic Accounts
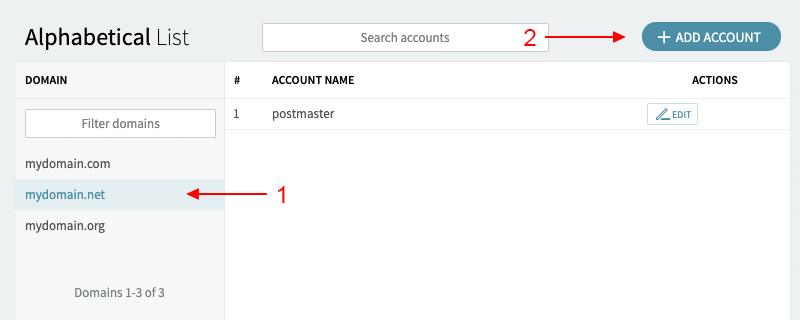
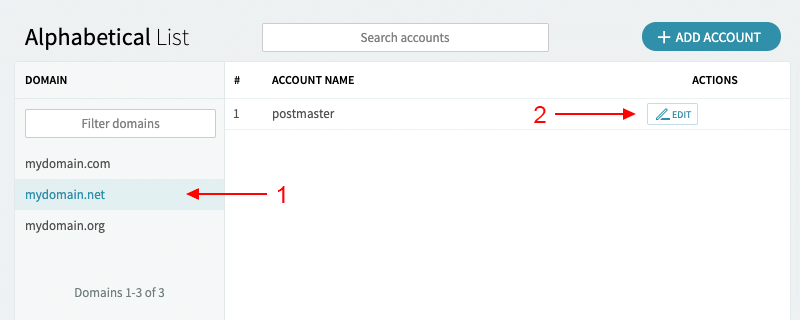
- Navigate to WebAdmin → Domains & Accounts → Manage Accounts and select the domain for which you want to create the new accounts (1)
- Press the “Add Account” button (2) and, in the popup that appears, ensure you have the correct domain in “Domain name”
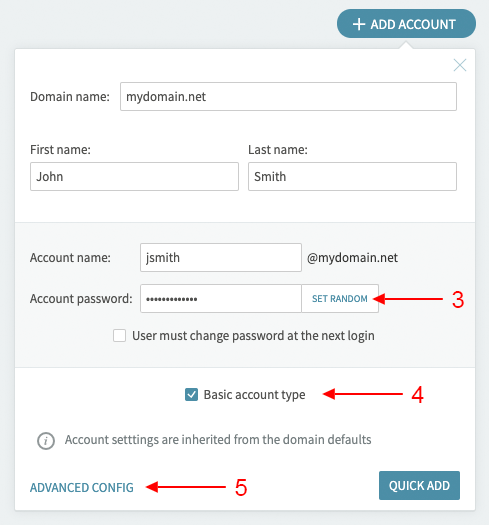
- Fill in the “First name”, “Last name”, “Account name”, and “Account password” (3), activate the “Basic account type” option (4), and then press “Advanced Config” (5)
- In Settings → Inherit configuration details from, choose from the drop-down list the class from which you wish to inherit the settings at account creation and then press “Save Configuration”

2.2. How to Create New Users with Premium Accounts
- The account creation process is similar to the one above, except for the last step where you should select the class_premium account class.

2.3. How to Create New Users with Pro Accounts
- The account creation process is similar to the one above, except for the last step where you should select the class_pro account class.

3. How Can MSPs Modify a User (Account) from an Account Class to Another
Following are the steps for Axigen MSP clients to modify the account types of their existing users and switch these users from one account class to another.
3.1. How to Switch to a Basic Account from Premium / Pro (downgrade)
- Navigate to WebAdmin → Domains & Accounts → Manage Accounts and select the domain for which you want to create the new accounts (1)
- Press “Edit” for the account you wish to modify (2)
- In Settings → Inherit configuration details from, choose from the drop-down list the class that you created for the Basic accounts (class_basic in this case), and then press “Save Configuration”
- In Services → This account is Premium, press the “Switch to Basic Account” button; the text of the label should change to “This account is Basic“


- Press “Save Configuration” before leaving the page
3.2. How to Switch to Premium / Pro Account from Basic (upgrade)
- The account class selection process is similar to the one above, choosing the corresponding account class (class_premium or class_pro, in our example)
- In Services → This account is Basic, press the “Switch to Premium Account“ button; the text of the label should change to “This account is Premium“
3.3. How to Switch to Pro from Premium (upgrade)
- Navigate to WebAdmin → Domains & Accounts → Manage Accounts and select the domain for which you want to create the new accounts (1)
- Press “Edit” for the account you wish to modify (2)
- In Settings → Inherit configuration details from, choose from the drop-down list the Pro class and then press “Save Configuration”
3.4. How to Switch to Premium from Pro Accounts (downgrade)
- Navigate to WebAdmin → Domains & Accounts → Manage Accounts and select the domain for which you want to create the new accounts (1)
- Press “Edit” for the account you wish to modify (2)
- Step 1: In Settings → Inherit configuration details from, choose from the drop-down list the Premium class and then press “Save Configuration”
- In order to reset the usage of any Pro specific addons (Sharing or Exchange ActiveSync), the following sequence is required:
- Step 2: In Services → This account is Premium, press the “Switch to Basic Account“ button; the text of the label should change to “This account is Basic“
-
the text of the label should change to “This account is Basic“
-
Step 3: Now, we need to change back the Services back to Premium, therefore press the “Switch to Premium Account“ button;
-
the text of the label should change to “This account is Premium“ as below:
4. How to Migrate Accounts from Your Legacy Platform into a Specific Account Class
Here's how you can migrate accounts and their existing emails from your legacy email platform to Axigen into a specific account class:
4.1. How to Do Manual Migration to a Specific Account Class
- For manual migration, we have to manually create the migrated account in one of the three account classes defined previously; we do so by following the steps in section 2. How to Create a New User (account) in Each Account Class
- After the creation of the account, we connect to Axigen, on the server we want to migrate to, via Telnet:
<login> user admin
<password> your_admin_password
- We then access our domain context and run the migrate command for the account in question:
+OK: command successful
<domain#> MIGRATE ACCOUNT user REMOTEHOST [legacy_server_ip] REMOTEPORT 143 bREMOTEUSER user@mydomain.net REMOTEPASS user_password
where:
- mydomain.net — the domain we wish to migrate
- user — the account name we wish to migrate
- [legacy_server_ip] — the IP of the legacy server that must be visible to Axigen; it is mandatory that we put the IP between square brackets
- 143 / 993 — the port for the IMAP service on the legacy server
- user_password — password of the account we wish to migrate
4.2. How to Do Automatic Migration to a Specific Account Class
- For automatic migration, we have to first create the domain and the account classes we wish to migrate on the Axigen server; assuming the domain is already created, for the creation of the account classes, we must follow the steps in section 1. How to Create the Account Classes
- Then navigate to WebAdmin → Automatic Migration → Enable (on the domain we wish to migrate) then Configure (for the same domain)
- In the popup that will be displayed, we need to:
- select the account class to which we need to migrate (1)
- fill in the legacy server IP that must be visible by Axigen (2); the legacy server IP must be between square brackets
- fill in the SMTP and IMAP ports (3): SMTP 25 and IMAP 143
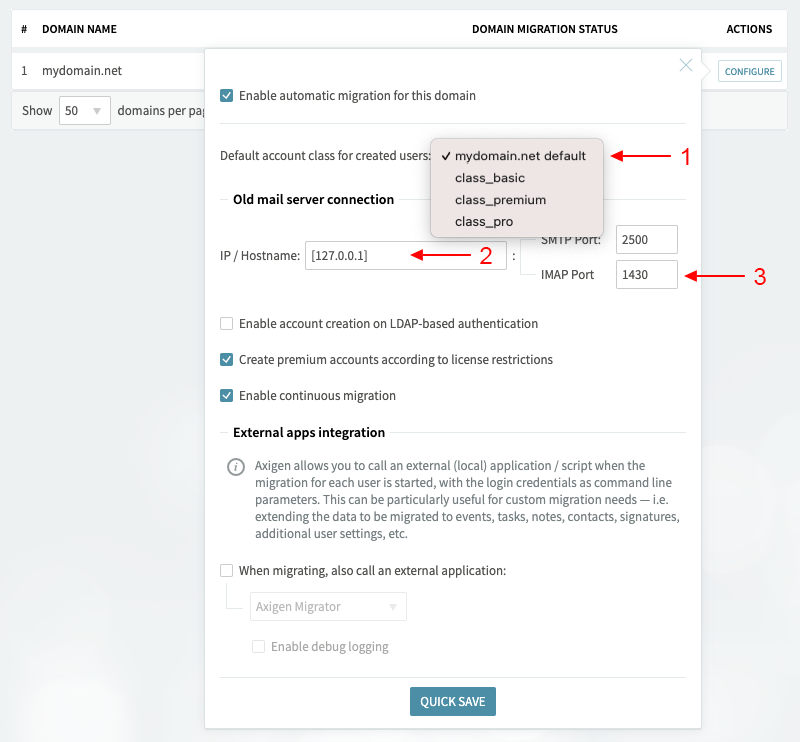
- For the class that we selected for migration, we must also activate the “Enable automatic migration for this account class“ in WebAdmin → Domains & Accounts → Account Classes → Edit (on the class we want to modify) → Auto Migration

- Now that we have configured the automatic migration, when a user performs a successful login with Axigen, if that user’s account does not exist, it will be created automatically, using the name and password supplied by the user. All its emails, notes, and contacts are imported.
Note: An aspect to consider regarding automatic migration is that it only migrates accounts to the account class we configured in WebAdmin → Automatic Migration. In this case, we would want to determine which category most accounts from our legacy fall into and use the correspondent class for migration.
5. How to Adjust the Number of Provisioned Users per Account Class
Our MSP customers receive a monthly usage report that includes the most recent number of provisioned users. Based on that report, we issue a monthly invoice according to your usage.
Note: In the legacy MSP licensing model, we issue quarterly readjustment invoices if the number of users (by type) in the report exceeds the number of agreed users.
You can verify your number of provisioned users through the WebAdmin as follows:
5.1 How to Check the Number of Existing Accounts
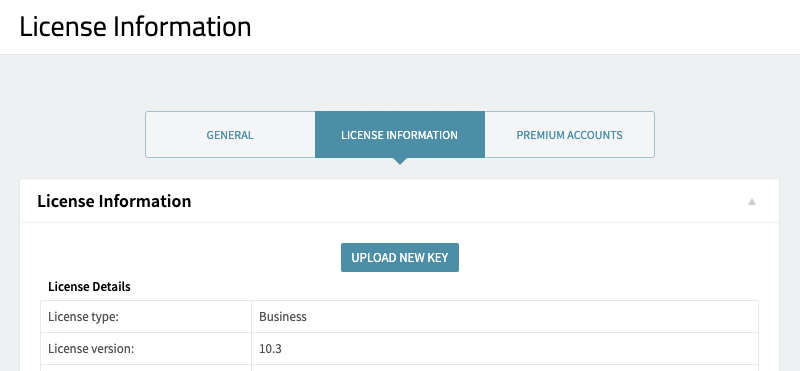
In the WebAdmin menu, go to Global Settings → License Information
Under the License Restrictions section, you can review the number of total accounts you have provisioned (Basic, Premium, and Pro)
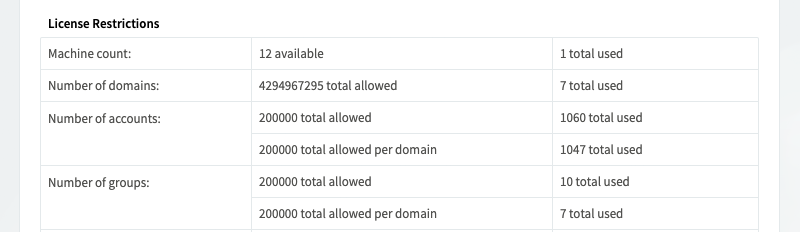
To see MSP Premium Accounts as well as MSP Pro Users, check the Premium Accounts tab
Pro Users are the ones that use Sharing and / or ActiveSync. If an account uses just one of the two, it’s still considered a Pro account.
Premium Users are the ones that don’t have Sharing or ActiveSync enabled
6. How to Make Sure Your Usage Statistics Are Enabled
As an MSP customer, you get billed based on your usage. The process depends on your Axigen installation sending anonymous usage statistics to us.
To make sure usage statistics are being correctly delivered, log in to your Axigen WebAdmin and go to Queue → View Queue.
If there are any email messages addressed to statistics@axigen.com in your queue:
- please select all the emails
- click the "Retry Now" button
Once you complete those two steps, your server will attempt to resend those usage statistics.
6.1 Troubleshooting Your Usage Statistics
If your issues persist and usage statistics still aren’t being delivered, you can troubleshoot the method below:
1. Locate the logs directory, available by default in your Axigen installation directory:
- For Linux: /var/opt/axigen/logs/
- For Docker: /axigen/var/logs/
- For Windows: C:\Program Files\Axigen Mail Server\logs\
2. Search your logs for "statistics@axigen.com"
By default, your logs are gathered in everything.txt.
If you've made any customizations, you can search all your files and gather the results into a single text document. On Linux, you can do this through the following command:
grep statistics@axigen.com /var/opt/axigen/log/everything.txt > /tmp/grep_result.txt
On Windows, this could be done using the regular command prompt, in your log directory:
findstr "statistics@axigen.com" everything.txt
Next, you’ll have to open a support ticket and provide our tech team with an archive containing the search results gathered above.
6.2 Getting a Copy of Your Usage Statistics
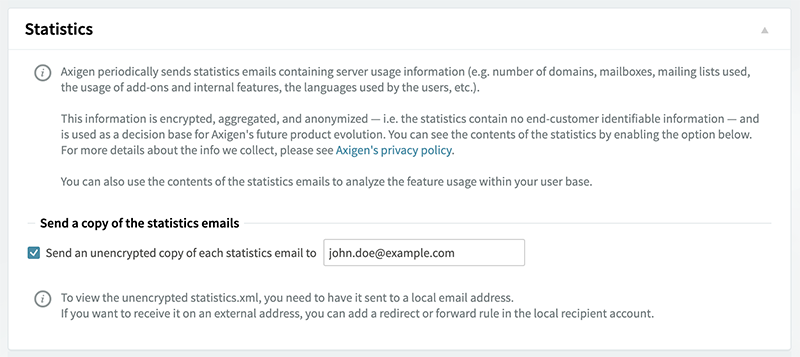
To get your own copy of the usage statistics your Axigen installation generates:
- Open your WebAdmin
- Navigate to Global Settings
- In the Statistics section, check the "Send an unencrypted copy of each statistics email to" option
- Enter the email address where you wish to receive a copy of your usage reports.