This article describes how to setup your iPhone in order to synchronize Mail (Push), Calendar and Contacts with Axigen using ActiveSync.
Solution
Before proceeding with the instructions in this article, make sure that the ActiveSync functionality is available in your AXIGEN Mail Server license and enabled for the account in question. Information on how to enable ActiveSync for an account in AXIGEN can be found in the related KnowledgeBase article available here.
NOTE: We strongly recommend to Back up your iPhone data on your Personal Computer using the iTunes PC suite. For proper integration we recommend on using an iPhone firmware >2.0.
Configuring your iPhone
1) Contacts synchronization:
To sync your iPhone contacts with the Axigen user Contacts, you will first have to take the following steps. If you do not intend to sync your contacts skip to section 2.
- Connect your iPhone to the PC via iTunes.
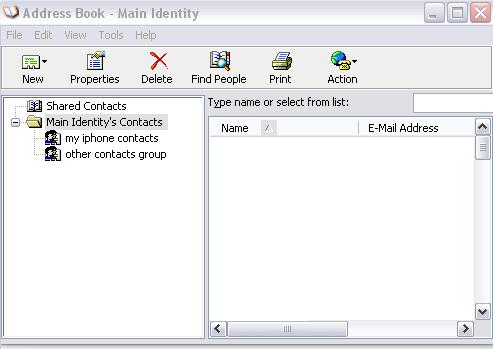
- In Windows go to Start -> All Programs -> Accessories -> Address Book.
- In the Address Book management window click on the "New" button and select the "New Group" option. In the group Properties window enter a name for the group (ex: my iphone contacts) and click "OK".
- Now you will have to import the Contacts from your iPhone to this address book. to accomplish this open the iTunes application (make sure your iPhone is connected to your PC) and select your iPhone from the Devices section found in the left side of your iTunes window.
- Go the the "Info" tab -> "Contacts" section. Here check the box related to "Sync contacts with" option and from the drop down box on the left select "Windows Address Book". Then check the "Selected groups" options and check the box related to the group created in the above steps (in our example "my iphone contacts").
- The most important step is to check the box related to the "Put new contacts created on this iPhone into the group" and select from the corresponding drop-down box the "my iphone contacts" windows address book group.
- Click the "Apply" button found in the left-down side of the iTunes window.
Wait a few moments for the Sync to complete.
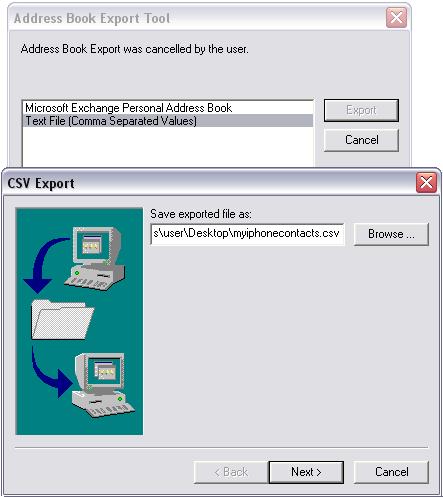
- Now switch to your Windows Address Book window and go to File -> Export -> Other Address Book. In the "Address Book Export Tool" Window select "Text File (Comma Separated Values)" from the export to file type list and click the "Export" button. Enter the location and filename you wish to export your contacts to and click "Next".
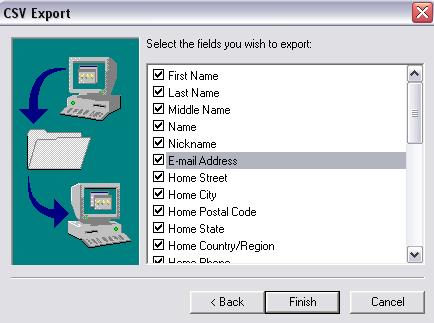
- Select the fields you wish to export from the list and click "Finish".
WARNING: If the above steps are not performed and you enable the Contacts synchronization in your iPhone configuration process, you will LOSE all your iPhone contacts, which will be replaced with the existing ones in your Webmail Contacts folder.
2) Email and Calendar synchronization:
On your iPhone go to Settings -> Mail, Contacts, Calendars and in the Accounts section select "Add Account".
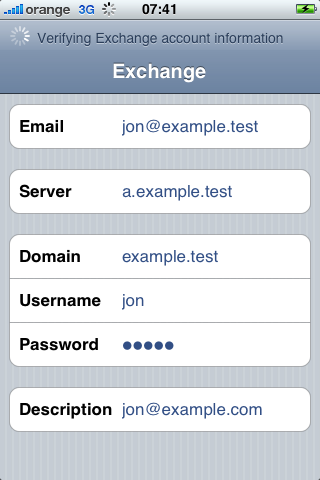
For the account type, choose "Microsoft Exchange". Now enter the details for your Axigen account, as follows:
Email - the email address of your Axigen account.
Domain - the corresponding domain name configured on your Axigen
server.
Username - the username used to login on your Axigen account.
Password - your email account password.
After filling in the above fields click "Next". Now enter in the Server field, the IP address or corresponding DNS MX entry of your Axigen Mail Server and click "Next". The account details will be verified by attempting to connect to the respective email account.
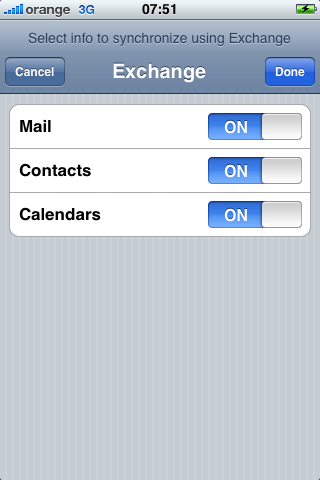
In the next screen you will be required to select the information you wish to synchronize between your iPhone and the Axigen account.
WARNING: If you did not follow the above step 1), you should not enable the Contacts synchronization, as this will result in the replacement of your iPhone contacts with the Axigen email account contacts. You will also receive two confirmation requests on your iPhone, before starting the Contacts synchronization. Also enabling the Calendar synchronization will override any calendar data you previously had on your iPhone with the Calendar information of your Axigen account.
To complete the Email synchronization you must enable the "Push" email option for your iPhone, via Settings -> Fetch New Data. This will ensure that when you receive a new email on your Axigen account, it will be pushed to your iPhone from the Axigen server, thus ensuring data consistency.
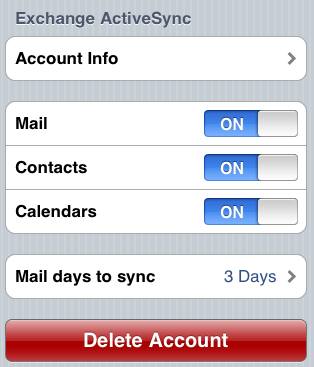
To modify the account settings or synchronization information, after the initial setup, you can simply select at any time the respective account in Settings -> Mail, Contacts, Calendars -> Accounts section. The options you will find are presented in the below images.
NOTE: If you turn off the Contacts synchronization after you previously enabled it, the iPhone Contacts will be empty. To restore your contacts, without re-enabling the synchronization with the Axigen account, connect your iPhone to your PC and click the "Sync" button in the DEVICES -> select your iPhone -> Info tab.
When you stop the synchronization process all Contacts or Calendar data, as the case might be, will be removed from your iPhone. Warnings related to this will be displayed when attempting to stop the synchronization.
NOTE: We strongly recommend to Back up your iPhone data on your Personal Computer using the iTunes PC suite. For proper integration we recommend on using an iPhone firmware >2.0.
Configuring your iPhone
1) Contacts synchronization:
To sync your iPhone contacts with the Axigen user Contacts, you will first have to take the following steps. If you do not intend to sync your contacts skip to section 2.
- Connect your iPhone to the PC via iTunes.
- In Windows go to Start -> All Programs -> Accessories -> Address Book.
- In the Address Book management window click on the "New" button and select the "New Group" option. In the group Properties window enter a name for the group (ex: my iphone contacts) and click "OK".
- Now you will have to import the Contacts from your iPhone to this address book. to accomplish this open the iTunes application (make sure your iPhone is connected to your PC) and select your iPhone from the Devices section found in the left side of your iTunes window.
- Go the the "Info" tab -> "Contacts" section. Here check the box related to "Sync contacts with" option and from the drop down box on the left select "Windows Address Book". Then check the "Selected groups" options and check the box related to the group created in the above steps (in our example "my iphone contacts").
- The most important step is to check the box related to the "Put new contacts created on this iPhone into the group" and select from the corresponding drop-down box the "my iphone contacts" windows address book group.
- Click the "Apply" button found in the left-down side of the iTunes window.
Wait a few moments for the Sync to complete.
- Now switch to your Windows Address Book window and go to File -> Export -> Other Address Book. In the "Address Book Export Tool" Window select "Text File (Comma Separated Values)" from the export to file type list and click the "Export" button. Enter the location and filename you wish to export your contacts to and click "Next".
- Select the fields you wish to export from the list and click "Finish".
- Next, we need to import the CSV file we previously have exported, in the AXIGEN WebMail interface. Open your favorite browser, login, via the Webmail interface, into your AXIGEN account and go to Contacts -> Import Contacts, click on the Browse button and choose the file that you have exported your address book to, in the previous step. A message should inform you how many contacts have been imported from the specified file.
At this time all you iPhone contacts are also found in your user Webmail -> Contacts folder. As such when you will enable the Contacts synchronization in your iPhone Activesync configuration, you will not loose any data.WARNING: If the above steps are not performed and you enable the Contacts synchronization in your iPhone configuration process, you will LOSE all your iPhone contacts, which will be replaced with the existing ones in your Webmail Contacts folder.
2) Email and Calendar synchronization:
On your iPhone go to Settings -> Mail, Contacts, Calendars and in the Accounts section select "Add Account".
For the account type, choose "Microsoft Exchange". Now enter the details for your Axigen account, as follows:
Email - the email address of your Axigen account.
Domain - the corresponding domain name configured on your Axigen
server.
Username - the username used to login on your Axigen account.
Password - your email account password.
After filling in the above fields click "Next". Now enter in the Server field, the IP address or corresponding DNS MX entry of your Axigen Mail Server and click "Next". The account details will be verified by attempting to connect to the respective email account.
In the next screen you will be required to select the information you wish to synchronize between your iPhone and the Axigen account.
WARNING: If you did not follow the above step 1), you should not enable the Contacts synchronization, as this will result in the replacement of your iPhone contacts with the Axigen email account contacts. You will also receive two confirmation requests on your iPhone, before starting the Contacts synchronization. Also enabling the Calendar synchronization will override any calendar data you previously had on your iPhone with the Calendar information of your Axigen account.
To complete the Email synchronization you must enable the "Push" email option for your iPhone, via Settings -> Fetch New Data. This will ensure that when you receive a new email on your Axigen account, it will be pushed to your iPhone from the Axigen server, thus ensuring data consistency.
To modify the account settings or synchronization information, after the initial setup, you can simply select at any time the respective account in Settings -> Mail, Contacts, Calendars -> Accounts section. The options you will find are presented in the below images.
NOTE: If you turn off the Contacts synchronization after you previously enabled it, the iPhone Contacts will be empty. To restore your contacts, without re-enabling the synchronization with the Axigen account, connect your iPhone to your PC and click the "Sync" button in the DEVICES -> select your iPhone -> Info tab.
When you stop the synchronization process all Contacts or Calendar data, as the case might be, will be removed from your iPhone. Warnings related to this will be displayed when attempting to stop the synchronization.
OS:
LinuxWindowsFreeBSDNetBSDOpenBSDSolaris
Distros:
WindowsDEB based distros amd64FreeBSD 7.x