This document aims to explain how to install and configure Roundcube on a machine to act as a webmail interface for AXIGEN.
Solution
Roundcube installation
To set up Roundcube the following elements are required:
Download the tar-ball from the Roundcube website and save it on the machine that runs the web server.
After this step is completed, extract the archive content, copy the contents of the archive into a folder named "webmail-roundcube" and place this folder in the site root.
An example of the above steps, corresponding to a Linux OS (Debian) and version 0.3.1 of Roundcube, would be:
tar -xzvf roundcubemail-0.3.1.tar.gz
mkdir webmail-roundcube/
cp -Rv roundcubemail-0.3.1/* webmail-roundcube/
mv webmail-roundcube/ /var/www/
It is very important to make sure that the contents of this folder are accessible by the user running the web server. The Apache software uses "www-data" by default as the user. Permissions on the contents of the "webmail" folder must give read and write access to this user. Failing to do so will generate access errors while logging into the webmail interface. An example of such an error would be:

For a Linux OS use the following commands:
chown -R www-data:www-data /var/www/webmail-roundcube/
chmod -R u+rw /var/www/webmail-roundcube/
At this point, when you access in a web browser the Roundcube Webmail using the base address followed by the name of the folder, in this case "webmail-roundcube" (https://www.mysite.org/webmail-roundcube), you will get the below message:
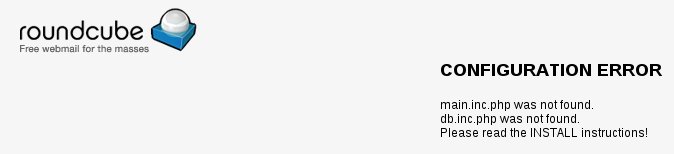
If this page is not accessible at all and you get an error you probably have encountered an issue related to access rights. Go back to the previous steps and make sure that everything is configured accordingly and retry.
Next thing is to decide what database backend you will use. The most common is MySQL but others are PostgreSQL and SQLite. So once you decide, create a database with any name you want and grant privileges to a separate database user. It's recommended not to use an existing user or root.
Now run the Roundcube installer by accessing the page at https://www.mysite.org/webmail-roundcube/installer
The first page of the installer shows some requirements. Click "START INSTALLATION" to run the system check. At this point the installer checks if the requirements are met. In case you see some red NOT OK messages, you need to install or enable something. Follow the installer provided links or search the Webserver/MySQL/Operating system documentation to find out how to properly configure your environment.
For example if your Roundcube system check returns the following:
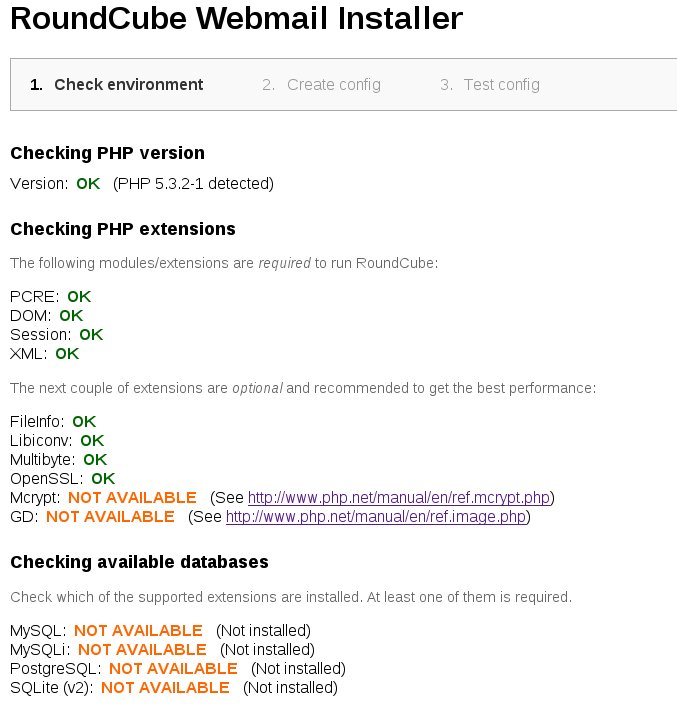
You have to install the related php extensions. For a Debian Linux OS, the commands to achieve this, would be:
apt-get install php5-gd php5-mcrypt php5-mysql
/etc/init.d/apache2 restart
If you encounter errors in the "Checking php.ini/.htaccess" section, then you should make sure that your Apache server is configured to use .htaccess files and that the .htaccess file contained in the roundcube archive is present in the /var/www/webmail-rouncube/ or the directory where you placed the roundcube Webmail data. To copy the Roundcube provided .htaccess file, from the unpack directory, use the command:
cp /home/user/kits/roundcubemail-0.3.1/.htaccess /var/www/webmail-roundcube/
NOTE: replace the above directories to reflect the original Roundcube unpack directory and the path were the Webmail data resides in your webroot. Make sure that the .htaccess file has the appropriate permissions for the www-data user.
chown -R www-data:www-data /var/www/webmail-roundcube/
chmod -R u+rw /var/www/webmail-roundcube/
An example on how to enable the use of .htaccess files for the Roundcube Webmail page would consist in adding the following to your Apache configuration:
<Directory /var/www/webmail-roundcube/>
AllowOverride All
</Directory>
Restart your Apache service for the changes to take effect.
Once the required Roundcube installer environment checks are marked OK, the "Next" button, at the bottom of the page, will become available. click it to proceed with the Roundcube Installation.
Roundcube configuration
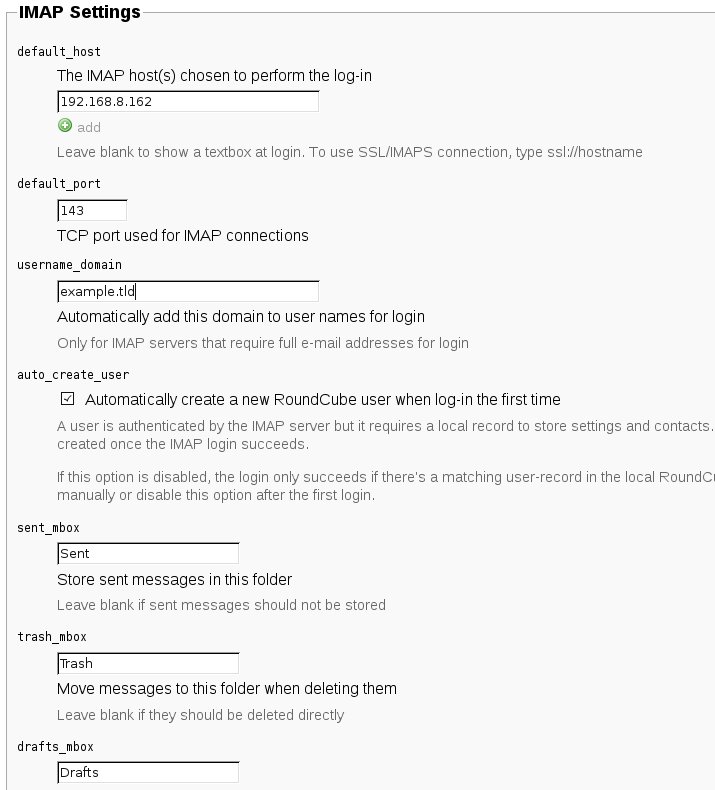
In the Create config window, set the desired Roundcube Webmail interface parameters. In the IMAP settings section enter, in the default_host and default_port fields, the hostname or IP address of the Axigen server and the corresponding Axigen IMAP listener port (by default 143). You can specify via the username_domain parameter, a domain name that will be automatically appended to the user provided credentials in the login page. Check the box related to the "" option, to ensure that users that successfully login to their Axigen account are also automatically added to the Roundcube database. Set "Spam" for the junk_mbox parameter, if you wish to use the default Axigen Spam folder for storing spam messages. Otherwise the default set Junk folder will be created by Roundcube, as this is it's implicit value.
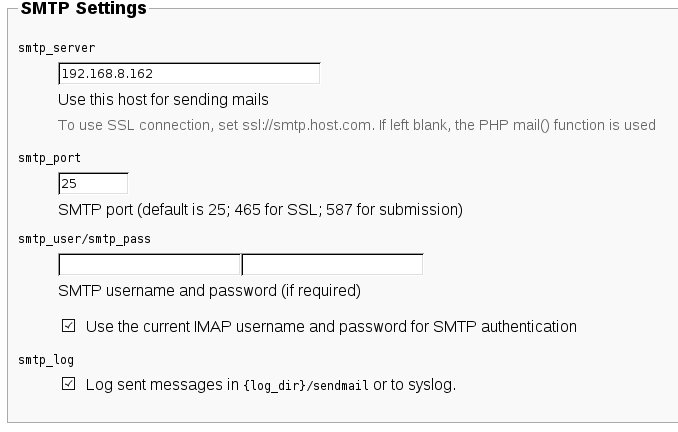
In the SMTP Settings section, enter, in the smtp_server and smtp_port fields, the corresponding Axigen hostname or IP address and the Axigen SMTP Listener port (by default 25). Also check the box related to the "Use the current IMAP username and password for SMTP authentication" option, to ensure that users are properly authenticated when sending relay messages via your Axigen server.
Click the "Create config" button at the bottom of the page, when you are done configuring the Roundcube settings.
Now you have to copy or download the generated configuration files and save them in two files (names above the text box) within the /var/www/webmail-roundcube/config directory of your RoundCube installation. Make sure that there are no characters outside the <?php ?> brackets when saving the files.
After you download the configuration files copy them to the required folder and make sure you set the proper permissions for the files. An example for a Debian Linux OS would be:
cp /home/user/kits/db.inc.php /var/www/webmail-roundcube/config/
cp /home/user/kits/main.inc.php /var/www/webmail-roundcube/config/
NOTE: replace the above directories to reflect the directory where you downloaded the configuration files and the path were the Webmail data resides in your webroot. Make sure that the files hve the appropriate permissions for the www-data user.
chown -R www-data:www-data /var/www/webmail-roundcube/
chmod -R u+rw /var/www/webmail-roundcube/
Click the "CONTINUE" button to test your Roundcube configuration.
If the Roundcube configuration is correct and the MySQL database is properly configured with the correct permissions, you will see the below screen:
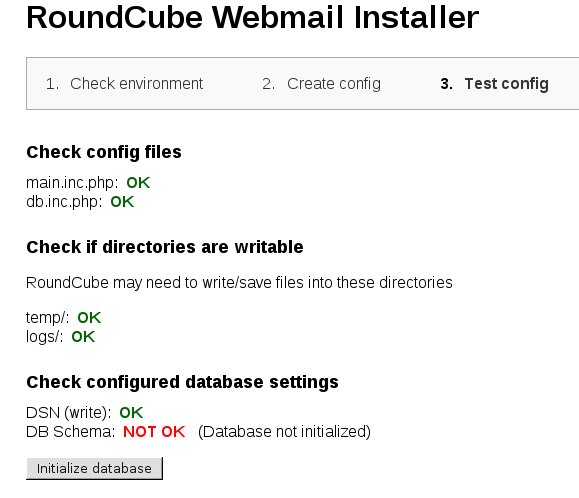
Click the "Initialize database" button to allow Roundcube to access and configure the related MySQL database.
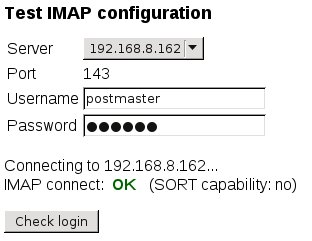
In the Test configuration window you can also check if the IMAP and SMTP server settings are correct and communication with the related Axigen services are working.
The test results should return the "OK" status, as shown below.
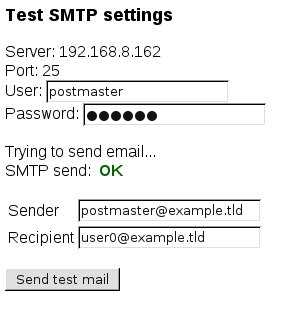
NOTE: The SMTP send email check will fail if you attempt to send a test email to an external domain (relay email), because the Roundcube test dows not authenticate before sending the email. This is a normal behavior as your Axigen servcer will implicitly require authentication before sending relay messages. This is a measure to ensure that your MTA is not an open-relay. However if you checked the related "Use the current IMAP username and password for SMTP authentication" option, as detailed in the above Roundcube configuration, you will not encounter any issues when sending an email via the Roundcube Webmail interface.
After completing the installation and the final tests, Rouncube recommends the removal of the whole installer folder from the document root of the webserver.
These files may expose sensitive configuration data like server passwords and encryption keys to the public. Make sure you cannot access this installer from your browser.
For more details on how to install and configure Roundcube, please consult the related Roundcube documentation at:
https://github.com/roundcube/roundcubemail/wiki/Install-Requirements
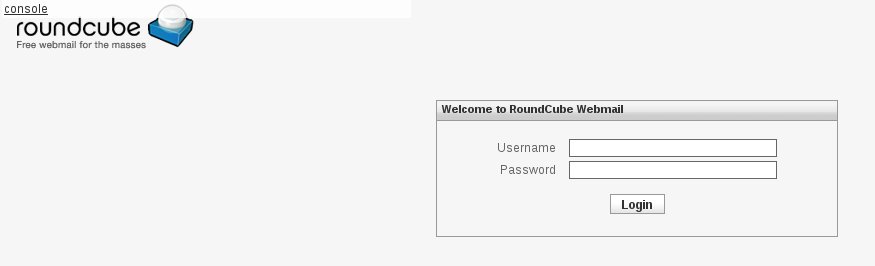
Login to your Axigen account via the Roundcube Webmail, by accessing the setup Web page. In our example this would be:
https://my-website.com/webmail-roundcube
Axigen configuration
To make sure that Roundcube will be able to use the Axigen IMAP and SMTP Receiving services, first make sure that these are enabled in Axigen, via Webadmin -> Services -> Services Management.
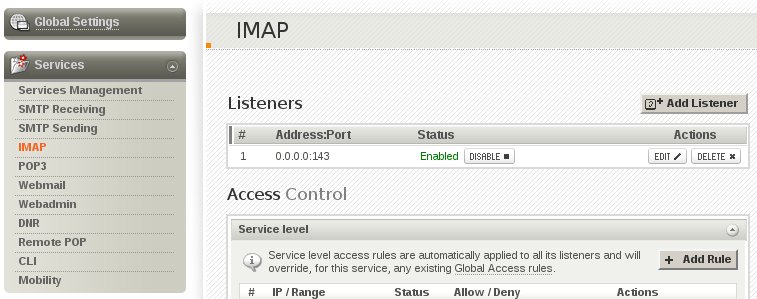
Also the Axigen IMAP and SMTP Receiving services should have a listener enabled on the appropriate IP/port, which you configured in the Roundcube setup. This can be enabled via the Webadmin -> Services -> IMAP / SMTP Receiving -> Listeners section.
Make sure that for the IMAP service, at least one authentication method is allowed for the Non-SSL connections. Roundcube will successfully use Cram-MD5 and Digest-MD5.
IMPORTANT: If you configured Roundcube to use SSL when accessing the Axigen IMAP service, you will have to add a SSL listener to the IMAP service. to create a SSL listener, consult our related article at:
https://www.axigen.com/kb/show/213
By default the IMAP SSL listener must be set on port 993.
To set up Roundcube the following elements are required:
- A PHP enabled web server (Apache, Lighttpd (>=1.4.13 for SSL), or Cherokee Web server ).
- PHP version 5.2.1 or greater.
- MySQL or PostgreSQL, a database server and database user with permission to create tables.
Download the tar-ball from the Roundcube website and save it on the machine that runs the web server.
After this step is completed, extract the archive content, copy the contents of the archive into a folder named "webmail-roundcube" and place this folder in the site root.
An example of the above steps, corresponding to a Linux OS (Debian) and version 0.3.1 of Roundcube, would be:
tar -xzvf roundcubemail-0.3.1.tar.gz
mkdir webmail-roundcube/
cp -Rv roundcubemail-0.3.1/* webmail-roundcube/
mv webmail-roundcube/ /var/www/
It is very important to make sure that the contents of this folder are accessible by the user running the web server. The Apache software uses "www-data" by default as the user. Permissions on the contents of the "webmail" folder must give read and write access to this user. Failing to do so will generate access errors while logging into the webmail interface. An example of such an error would be:
For a Linux OS use the following commands:
chown -R www-data:www-data /var/www/webmail-roundcube/
chmod -R u+rw /var/www/webmail-roundcube/
At this point, when you access in a web browser the Roundcube Webmail using the base address followed by the name of the folder, in this case "webmail-roundcube" (https://www.mysite.org/webmail-roundcube), you will get the below message:
If this page is not accessible at all and you get an error you probably have encountered an issue related to access rights. Go back to the previous steps and make sure that everything is configured accordingly and retry.
Next thing is to decide what database backend you will use. The most common is MySQL but others are PostgreSQL and SQLite. So once you decide, create a database with any name you want and grant privileges to a separate database user. It's recommended not to use an existing user or root.
With MySQL you can set up the database by issuing the following commands:
CREATE DATABASE roundcubemail;
GRANT ALL PRIVILEGES ON roundcubemail.* TO username@localhost IDENTIFIED BY 'password';
(of course you have to replace the database, username and password accordingly)
See the INSTALL file found in the unpacked webmail-roundcube directory for information about setting up PostgreSQL or SQLite
If you are using MySQL, be sure to flush the users privileges when you add a new user or you will get a database connection error:
FLUSH PRIVILEGES;
Now run the Roundcube installer by accessing the page at https://www.mysite.org/webmail-roundcube/installer
The first page of the installer shows some requirements. Click "START INSTALLATION" to run the system check. At this point the installer checks if the requirements are met. In case you see some red NOT OK messages, you need to install or enable something. Follow the installer provided links or search the Webserver/MySQL/Operating system documentation to find out how to properly configure your environment.
For example if your Roundcube system check returns the following:
You have to install the related php extensions. For a Debian Linux OS, the commands to achieve this, would be:
apt-get install php5-gd php5-mcrypt php5-mysql
/etc/init.d/apache2 restart
If you encounter errors in the "Checking php.ini/.htaccess" section, then you should make sure that your Apache server is configured to use .htaccess files and that the .htaccess file contained in the roundcube archive is present in the /var/www/webmail-rouncube/ or the directory where you placed the roundcube Webmail data. To copy the Roundcube provided .htaccess file, from the unpack directory, use the command:
cp /home/user/kits/roundcubemail-0.3.1/.htaccess /var/www/webmail-roundcube/
NOTE: replace the above directories to reflect the original Roundcube unpack directory and the path were the Webmail data resides in your webroot. Make sure that the .htaccess file has the appropriate permissions for the www-data user.
chown -R www-data:www-data /var/www/webmail-roundcube/
chmod -R u+rw /var/www/webmail-roundcube/
An example on how to enable the use of .htaccess files for the Roundcube Webmail page would consist in adding the following to your Apache configuration:
<Directory /var/www/webmail-roundcube/>
AllowOverride All
</Directory>
Restart your Apache service for the changes to take effect.
Once the required Roundcube installer environment checks are marked OK, the "Next" button, at the bottom of the page, will become available. click it to proceed with the Roundcube Installation.
Roundcube configuration
In the Create config window, set the desired Roundcube Webmail interface parameters. In the IMAP settings section enter, in the default_host and default_port fields, the hostname or IP address of the Axigen server and the corresponding Axigen IMAP listener port (by default 143). You can specify via the username_domain parameter, a domain name that will be automatically appended to the user provided credentials in the login page. Check the box related to the "" option, to ensure that users that successfully login to their Axigen account are also automatically added to the Roundcube database. Set "Spam" for the junk_mbox parameter, if you wish to use the default Axigen Spam folder for storing spam messages. Otherwise the default set Junk folder will be created by Roundcube, as this is it's implicit value.
In the SMTP Settings section, enter, in the smtp_server and smtp_port fields, the corresponding Axigen hostname or IP address and the Axigen SMTP Listener port (by default 25). Also check the box related to the "Use the current IMAP username and password for SMTP authentication" option, to ensure that users are properly authenticated when sending relay messages via your Axigen server.
Click the "Create config" button at the bottom of the page, when you are done configuring the Roundcube settings.
Now you have to copy or download the generated configuration files and save them in two files (names above the text box) within the /var/www/webmail-roundcube/config directory of your RoundCube installation. Make sure that there are no characters outside the <?php ?> brackets when saving the files.
After you download the configuration files copy them to the required folder and make sure you set the proper permissions for the files. An example for a Debian Linux OS would be:
cp /home/user/kits/db.inc.php /var/www/webmail-roundcube/config/
cp /home/user/kits/main.inc.php /var/www/webmail-roundcube/config/
NOTE: replace the above directories to reflect the directory where you downloaded the configuration files and the path were the Webmail data resides in your webroot. Make sure that the files hve the appropriate permissions for the www-data user.
chown -R www-data:www-data /var/www/webmail-roundcube/
chmod -R u+rw /var/www/webmail-roundcube/
Click the "CONTINUE" button to test your Roundcube configuration.
If the Roundcube configuration is correct and the MySQL database is properly configured with the correct permissions, you will see the below screen:
Click the "Initialize database" button to allow Roundcube to access and configure the related MySQL database.
In the Test configuration window you can also check if the IMAP and SMTP server settings are correct and communication with the related Axigen services are working.
The test results should return the "OK" status, as shown below.
NOTE: The SMTP send email check will fail if you attempt to send a test email to an external domain (relay email), because the Roundcube test dows not authenticate before sending the email. This is a normal behavior as your Axigen servcer will implicitly require authentication before sending relay messages. This is a measure to ensure that your MTA is not an open-relay. However if you checked the related "Use the current IMAP username and password for SMTP authentication" option, as detailed in the above Roundcube configuration, you will not encounter any issues when sending an email via the Roundcube Webmail interface.
After completing the installation and the final tests, Rouncube recommends the removal of the whole installer folder from the document root of the webserver.
These files may expose sensitive configuration data like server passwords and encryption keys to the public. Make sure you cannot access this installer from your browser.
For more details on how to install and configure Roundcube, please consult the related Roundcube documentation at:
https://github.com/roundcube/roundcubemail/wiki/Install-Requirements
Login to your Axigen account via the Roundcube Webmail, by accessing the setup Web page. In our example this would be:
https://my-website.com/webmail-roundcube
Axigen configuration
To make sure that Roundcube will be able to use the Axigen IMAP and SMTP Receiving services, first make sure that these are enabled in Axigen, via Webadmin -> Services -> Services Management.
Also the Axigen IMAP and SMTP Receiving services should have a listener enabled on the appropriate IP/port, which you configured in the Roundcube setup. This can be enabled via the Webadmin -> Services -> IMAP / SMTP Receiving -> Listeners section.
Make sure that for the IMAP service, at least one authentication method is allowed for the Non-SSL connections. Roundcube will successfully use Cram-MD5 and Digest-MD5.
IMPORTANT: If you configured Roundcube to use SSL when accessing the Axigen IMAP service, you will have to add a SSL listener to the IMAP service. to create a SSL listener, consult our related article at:
https://www.axigen.com/kb/show/213
By default the IMAP SSL listener must be set on port 993.
OS:
LinuxFreeBSDNetBSDOpenBSDSolaris