This tutorial shows how to create and automate the subscription and unsubscription procedure for a Mailing List.
Solution
The scope of this article is to describe the steps in creating an automated mailing list in Axigen.
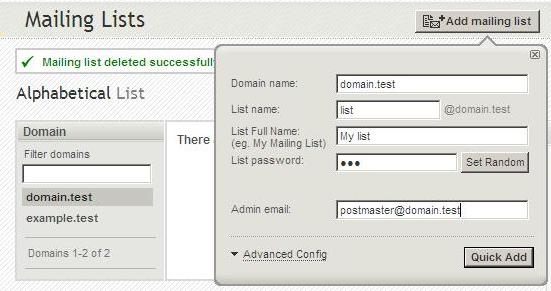
1.Create the mailing list via Webadmin → Domain & Accounts → Mailling Lists.
In our exaple we will create a mailing list on the domain named: domain.test.
The list's email address will be <List name>@domain.test
The "Admin email" can be any email address, we will use the postmaster@domain.test email address.
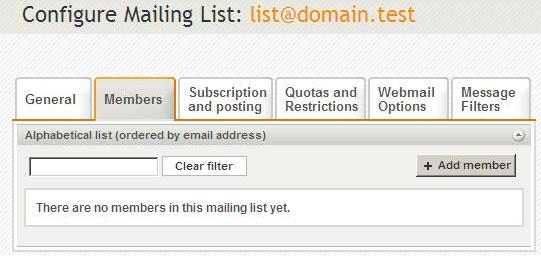
2. After creating the list click “Edit” in order to configure the mailing list.
In the Members tab you can add manually members for this list but the scope of this article is to setup an automated list, meaning that subscription and unsubscription from the list will be made without the list's admin intervention.
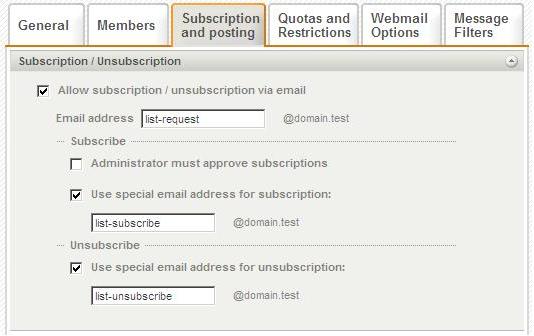
3. Click on the Subscription and posting tab
4. in the Subscription/Unsubscription area we will define rules regarding the subscription and unsubscription procedure:
a) Allow subscription / unsubscription via email – in this case it is list-request@domain.test and it is the email address (it is an alias of the list's address) responsible for sending administrative notifications to the members or interpret the requests sent from the users and take proper actions.
b) Administrator must approve subscription – check this if you want to manually approve or reject subscription requests. We will leave this option unchecked since this article describes how to create an automated mailing list
c) Use special email address for subscription respectively unsubscription – check these two options in order for subscription/unsubscription to be done using the specified addresses.
NOTE: Please keep in mind the following aspect. When a user sends an email to list-subscribe@domain.test he will receive a confirmation email from list-request@domain.test because we mentioned that list-request@domain.test is the administrative email address responsible for sending administrative notifications. This information will be usefull later on, when we will create the template message for Confirmation request.
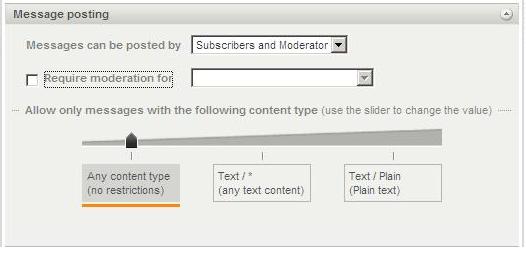
4. In the Message posting area select Subscribers and Moderator from the drop-down menu. Of course, based on how restrictive you need your list to be, you can select any of the options.
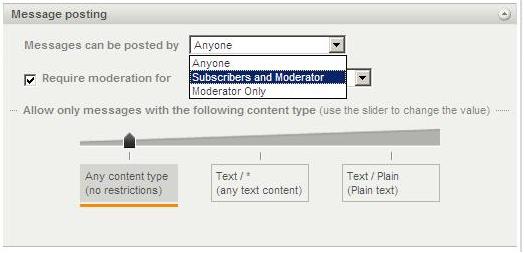
5. You must uncheck Require moderation for since we are setting up an automated list.
Set the slider to Any content type. If set to Text/Plain users will be able to send messages to the list only in plain text format. Messages sent from Webmail, for example, will not be posted if the slider is set to Text / Plain.
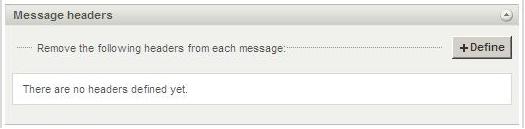
6. In the Message headers area you can define Headers in order to be removed from emails sent to and from the list. The practical application for this is described in this article.
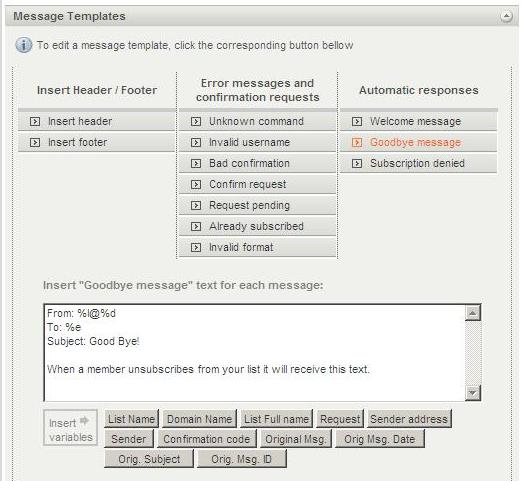
7. In the Message Templates area customize the messages sent automatically for requests from the user.
The format of the templates is described bellow:
<HEADERS>
<blank line> – the role of this blank line is to separate the headers from the body of the message.
<BODY>
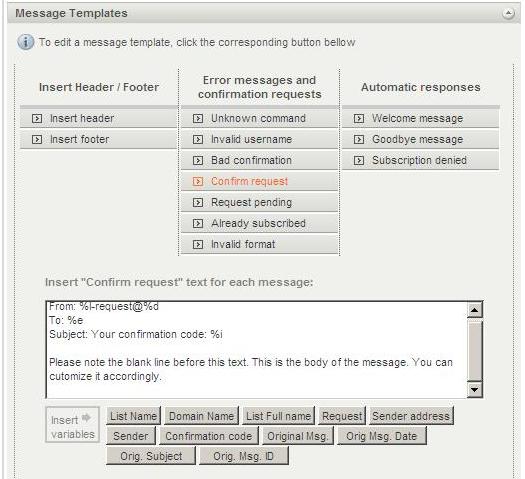
The first and most important is the Confirm request template. This email will be send when subscription/unsubscription requests are received from the users. Please find bellow the text and the explanations:
From: %l-request@%d - This line defines the From header. The %l and %d variables are expanded to list domain respectively domain name. They can be typed manually or inserted using the buttons bellow. Since this email is an administrative email sent to the users this email must be sent by the list-request@domain.test address.
To: %e – This header defines the To header as the sender address
Subject: Your confirmation code: %i - The %i ( Confirmation Code) variable is mandatory since it is an identification number for the request.
<BLANK LINE>
After the blank line customize the body of the message. It could be something simmilar to this one:
Hello,
Thank you for your interest in our list.
Please reply to this email in order to confirm your subscription.
Have a nice day!
When is this message template used?
When an user writes an email to list-subscribe@domain.test he will receive this email with a confirmation code in the Subject. The user must reply to this email in order to confirm it's subscription.
NOTE: Don't forget to Save Configuration every time a message template is defined.
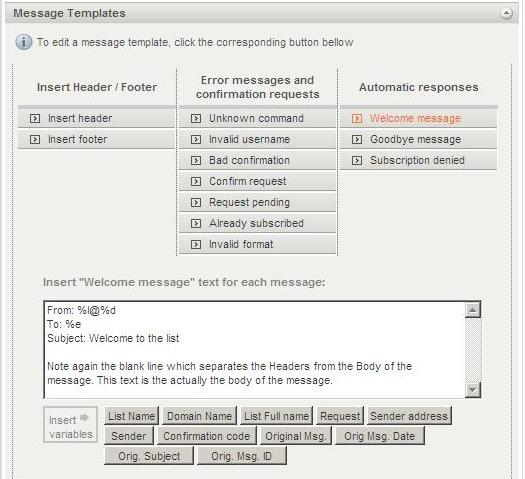
8. Defining the Welcome message template is similar to the Confirm request template with the following exception:
- the From header must be defined as %l@%d which expandes in our case in list@domain.test . Since this is not an administrative email the “-request” after the %l variable is not required.
When is this message template used?
After replying to the Confirm request message the user will receive this welcome message meaning that he is now subscribed and he can post messages to the list.
Don't forget to Save Configuration.
9. Goodbye message is similar to the Welcome message template except for the theme of the message which is now a good bye message.
When is this message template used?
When a member wants to unsubscribe from the list he will send an email to list-unsubscribe@domain.test. He will receive and email ( the Confirmation request template ) from list-request@domain.test with a confirmation code. He must then reply to that email in order to confirm it's unsubscription. Finally, the user will receive this Goodbye message template finalizing the unsubscription process.
Don't forget to Save Configuration.
1.Create the mailing list via Webadmin → Domain & Accounts → Mailling Lists.
In our exaple we will create a mailing list on the domain named: domain.test.
The list's email address will be <List name>@domain.test
The "Admin email" can be any email address, we will use the postmaster@domain.test email address.
2. After creating the list click “Edit” in order to configure the mailing list.
In the Members tab you can add manually members for this list but the scope of this article is to setup an automated list, meaning that subscription and unsubscription from the list will be made without the list's admin intervention.
3. Click on the Subscription and posting tab
4. in the Subscription/Unsubscription area we will define rules regarding the subscription and unsubscription procedure:
a) Allow subscription / unsubscription via email – in this case it is list-request@domain.test and it is the email address (it is an alias of the list's address) responsible for sending administrative notifications to the members or interpret the requests sent from the users and take proper actions.
b) Administrator must approve subscription – check this if you want to manually approve or reject subscription requests. We will leave this option unchecked since this article describes how to create an automated mailing list
c) Use special email address for subscription respectively unsubscription – check these two options in order for subscription/unsubscription to be done using the specified addresses.
NOTE: Please keep in mind the following aspect. When a user sends an email to list-subscribe@domain.test he will receive a confirmation email from list-request@domain.test because we mentioned that list-request@domain.test is the administrative email address responsible for sending administrative notifications. This information will be usefull later on, when we will create the template message for Confirmation request.
4. In the Message posting area select Subscribers and Moderator from the drop-down menu. Of course, based on how restrictive you need your list to be, you can select any of the options.
5. You must uncheck Require moderation for since we are setting up an automated list.
Set the slider to Any content type. If set to Text/Plain users will be able to send messages to the list only in plain text format. Messages sent from Webmail, for example, will not be posted if the slider is set to Text / Plain.
6. In the Message headers area you can define Headers in order to be removed from emails sent to and from the list. The practical application for this is described in this article.
7. In the Message Templates area customize the messages sent automatically for requests from the user.
The format of the templates is described bellow:
<HEADERS>
<blank line> – the role of this blank line is to separate the headers from the body of the message.
<BODY>
The first and most important is the Confirm request template. This email will be send when subscription/unsubscription requests are received from the users. Please find bellow the text and the explanations:
From: %l-request@%d - This line defines the From header. The %l and %d variables are expanded to list domain respectively domain name. They can be typed manually or inserted using the buttons bellow. Since this email is an administrative email sent to the users this email must be sent by the list-request@domain.test address.
To: %e – This header defines the To header as the sender address
Subject: Your confirmation code: %i - The %i ( Confirmation Code) variable is mandatory since it is an identification number for the request.
<BLANK LINE>
After the blank line customize the body of the message. It could be something simmilar to this one:
Hello,
Thank you for your interest in our list.
Please reply to this email in order to confirm your subscription.
Have a nice day!
When is this message template used?
When an user writes an email to list-subscribe@domain.test he will receive this email with a confirmation code in the Subject. The user must reply to this email in order to confirm it's subscription.
NOTE: Don't forget to Save Configuration every time a message template is defined.
8. Defining the Welcome message template is similar to the Confirm request template with the following exception:
- the From header must be defined as %l@%d which expandes in our case in list@domain.test . Since this is not an administrative email the “-request” after the %l variable is not required.
When is this message template used?
After replying to the Confirm request message the user will receive this welcome message meaning that he is now subscribed and he can post messages to the list.
Don't forget to Save Configuration.
9. Goodbye message is similar to the Welcome message template except for the theme of the message which is now a good bye message.
When is this message template used?
When a member wants to unsubscribe from the list he will send an email to list-unsubscribe@domain.test. He will receive and email ( the Confirmation request template ) from list-request@domain.test with a confirmation code. He must then reply to that email in order to confirm it's unsubscription. Finally, the user will receive this Goodbye message template finalizing the unsubscription process.
Don't forget to Save Configuration.