This article details the necessary steps that need to be taken in order to achieve account and group synchronization with an Active Directory in Axigen
Solution
Starting with Axigen 7.0, account and group synchronization with a LDAP implementation, including Active Directory is possible.
The basic requirements for this functionality to be usable with AD include:
An overview of the necessary steps in order to achieve a functional synchronization between Axigen and Active Directory is presented below:
1) Install the Axigen Active Directory Extension freely available on our Website
2) Define the necessary LDAP connector in Axigen
3) Enable LDAP synchronization for your Axigen domain
WARNING: Please back up the existing Active Directory installation before installing the Axigen AD extension. This step is very important because the Axigen Active Directory extension introduces some additional attributes in your AD schema. These modifications to the AD schema are irreversible (you can not remove the new attributes, but only disable them). Failure to create a functional backup of the Active Directory database before installing the AD extension and enabling the synchronization may result in permanent data loss.
Presenting the back-up procedure for Active Directory is beyond the scope of this article. However, we recommend consulting the following external resources as a starting point:
- http://msdn.microsoft.com/en-us/library/ms677103(VS.85).aspx
- http://technet.microsoft.com/en-us/library/cc740010.aspx
1. Installing the Axigen Active Directory Extension
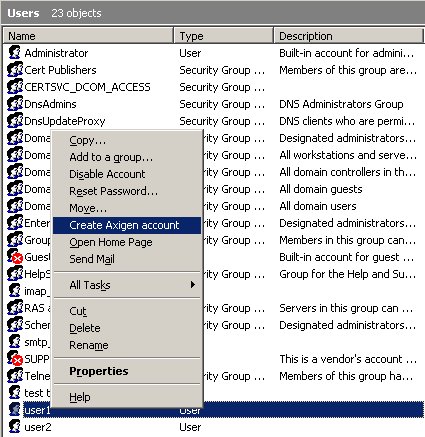
In order for existing AD users that were not created by Axigen to become usable within Axigen, the administrator must enable the Axigen-specific attributes via the 'Active Directory Users and Computers' management console. This operation can be performed from the user's right click menu in the AD User Management Console, as illustrated below:
Note: if the 'Create Axigen Account' option is selected for an account after the synchronization is operational, and the synchronization is bidirectional or AD to Axigen, the respective user account will be also created on the Axigen server if it does not already exist (as a result of the synchronization process).
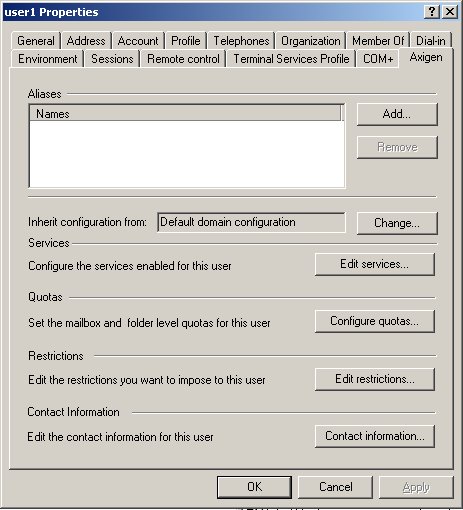
Once the Axigen-related attributes are enabled for an AD user, the 'Axigen' tab of the properties page on the Management Console can be used to customize his Axigen-related settings:
2. Defining the LDAP Connector in Axigen
The Axigen LDAP connector that is required for the synchronization should be defined according to the existing environment and to your requirements. Specifically, the following aspects should be taken into consideration:
- if you want to configure the acount parameters from the AD server only (via the 'Active Directory Users and Computers' management console), the synchronization direction should be LDAP to Axigen. This allows for a centralized administration of the various user services and options via the AD management console, when the AD server is also being used by other services, not only by Axigen.
- if you are mainly interested in using the AD for Axigen-related purposes, or the user accounts on your existing Axigen server are not yet defined in your (newly installed) AD server, you may use the Axigen to LDAP synchronization method.
- for all other scenarios, bidirectional (Both Ways) synchronization should be used. When bidirectional synchronization is used, one of the available conflict resolution mechanisms should be selected (a conflictual situation is encountered when a specific setting is altered both in the AD and in Axigen, between two successive polling moments).
Note: conflictual situations may also arise when one of the unidirectional synchronization options is selected, but in this case the conflict resolution mechanism is dictated by the synchronization direction:
- if LDAP to Axigen synchronization is selected, the LDAP settings will take precedence (conflict resolution is LDAP Wins)
- if Axigen to LDAP synchronization is selected, the Axigen settings will take precedence (conflict resolution is Axigen Wins)
A step-by-step procedure for defining the LDAP Connector is presented below:
- Admin DN: CN=administrator,CN=Users,DC=yourdomain,DC=tld
- Admin DN Password: ******
- Account Base DN: CN=Users,DC=yourdomain,DC=tld
- Group Base DN: CN=Groups,DC=yourdomain,DC=tld
The basic requirements for this functionality to be usable with AD include:
- Axigen version 7.0 or newer
- Active Directory provided with Windows Server 2003
- The Axigen Active Directory extension freely available on our Website
An overview of the necessary steps in order to achieve a functional synchronization between Axigen and Active Directory is presented below:
1) Install the Axigen Active Directory Extension freely available on our Website
2) Define the necessary LDAP connector in Axigen
3) Enable LDAP synchronization for your Axigen domain
WARNING: Please back up the existing Active Directory installation before installing the Axigen AD extension. This step is very important because the Axigen Active Directory extension introduces some additional attributes in your AD schema. These modifications to the AD schema are irreversible (you can not remove the new attributes, but only disable them). Failure to create a functional backup of the Active Directory database before installing the AD extension and enabling the synchronization may result in permanent data loss.
Presenting the back-up procedure for Active Directory is beyond the scope of this article. However, we recommend consulting the following external resources as a starting point:
- http://msdn.microsoft.com/en-us/library/ms677103(VS.85).aspx
- http://technet.microsoft.com/en-us/library/cc740010.aspx
1. Installing the Axigen Active Directory Extension
- download the Axigen Active Directory extension from the corresponding section of our Website: https://www.axigen.com/mail-server/download/
- open the downloaded msi file on the machine hosting AD and run through the installation wizard.
In order for existing AD users that were not created by Axigen to become usable within Axigen, the administrator must enable the Axigen-specific attributes via the 'Active Directory Users and Computers' management console. This operation can be performed from the user's right click menu in the AD User Management Console, as illustrated below:

Note: if the 'Create Axigen Account' option is selected for an account after the synchronization is operational, and the synchronization is bidirectional or AD to Axigen, the respective user account will be also created on the Axigen server if it does not already exist (as a result of the synchronization process).
Once the Axigen-related attributes are enabled for an AD user, the 'Axigen' tab of the properties page on the Management Console can be used to customize his Axigen-related settings:
2. Defining the LDAP Connector in Axigen
The Axigen LDAP connector that is required for the synchronization should be defined according to the existing environment and to your requirements. Specifically, the following aspects should be taken into consideration:
- if you want to configure the acount parameters from the AD server only (via the 'Active Directory Users and Computers' management console), the synchronization direction should be LDAP to Axigen. This allows for a centralized administration of the various user services and options via the AD management console, when the AD server is also being used by other services, not only by Axigen.
- if you are mainly interested in using the AD for Axigen-related purposes, or the user accounts on your existing Axigen server are not yet defined in your (newly installed) AD server, you may use the Axigen to LDAP synchronization method.
- for all other scenarios, bidirectional (Both Ways) synchronization should be used. When bidirectional synchronization is used, one of the available conflict resolution mechanisms should be selected (a conflictual situation is encountered when a specific setting is altered both in the AD and in Axigen, between two successive polling moments).
Note: conflictual situations may also arise when one of the unidirectional synchronization options is selected, but in this case the conflict resolution mechanism is dictated by the synchronization direction:
- if LDAP to Axigen synchronization is selected, the LDAP settings will take precedence (conflict resolution is LDAP Wins)
- if Axigen to LDAP synchronization is selected, the Axigen settings will take precedence (conflict resolution is Axigen Wins)
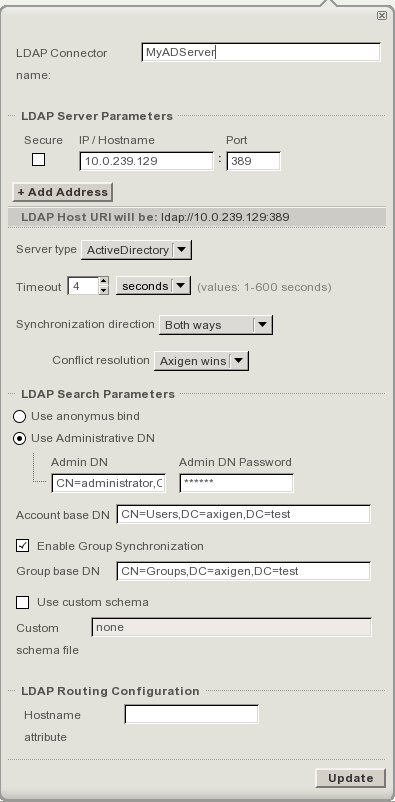
A step-by-step procedure for defining the LDAP Connector is presented below:
- Login into Axigen's Webadmin interface and select the Clustering -> Clustering Setup context
- In the Connector List section, press the Add Connector button
- Type a suggestive LDAP Connector name
- Type the server connection details in the IP/Hostname and Port fields
- From the Server Type drop-down list, select ActiveDirectory
- Choose the desired Synchronization Direction
- In the LDAP Search Parameters section, select the following options:
- Admin DN: CN=administrator,CN=Users,DC=yourdomain,DC=tld
- Admin DN Password: ******
- Account Base DN: CN=Users,DC=yourdomain,DC=tld
- Group Base DN: CN=Groups,DC=yourdomain,DC=tld
- Use the Quick Add button to save the LDAP connector
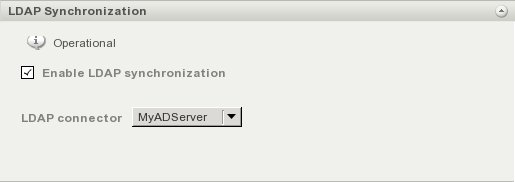
3. Enable LDAP synchronization for your Axigen domain

- within Axigen's Webadmin, select Domains & Accounts -> Manage Domains -> Edit on the desired domain context
- locate the LDAP Synchronization section
- select the Enable LDAP synchronization checkbox
- from the LDAP Connector drop-down list, select the connector you created at point 2
- Save the configuration using the button on the bottom of the page
- after saving the configuration, the synchronization status displayed in the section should change to Operational
OS:
LinuxWindowsFreeBSDNetBSDOpenBSDSolaris