Updated: March 15, 2025
2-Step Verification (Two Factor Authentication) for WebMail is available starting with Axigen X3 (10.3.x).
Starting with Axigen X6 (10.6.x), email and SMS have been added as 2-Step Verification methods.
2-Step Verification (Two Factor Authentication) helps securing access to the accounts by adding a second step to the authentication process — a one-time verification code.
Axigen implements 2-Step Verification by using the TOTP (Time-based One-time Password) algorithm via SMS, Email, or Compatible TOTP mobile apps: Google Authenticator, Microsoft Authenticator, or other compatible TOTP apps or dongles.
Administration
WebAdmin
How to Enable 2-Step Verification
You can enable this option in three ways:
-
in the Account Defaults (class) from WebAdmin → Domains & Accounts → Edit your domain → Account Defaults → Quotas and Restrictions → Restrictions section
-
in an Account Class from WebAdmin → Domains & Accounts → Account Classes → Edit your Account Class → Quotas and Restrictions tab in the Restrictions section
-
on account level from WebAdmin → Domains & Accounts → Manage Accounts → Edit the specific account → Quotas and Restrictions tab in the Restrictions section

Optionally, admins can enforce 2-Step Verification by selecting the "Make 2-Step Verification Mandatory" option.
For the SMS to be available as an additional 2-Step Verification method, an SMS connector is mandatory to be defined and assigned to the domain default account class.

How to View and Manage Devices, Status & Actions
Once enabled, admins can see the status for each user and disable or revoke all devices.
All the above can be found in Domains & Accounts → Manage Accounts → Edit on the account → in the General tab:

How to Configure 2-Step Verification from CLI
Admins can also configure 2-Step Verification from CLI.
Enabling / disabling / setting as mandatory:
Choosing what 2-Step Verification method to use:
Configuring 2-Step Verification at Account Defaults level (default account class of a domain):
Configuring 2-Step Verification at Account class level:
Configuring 2-Step Verification at account level:
User Interaction
WebMail
How to Turn 2-Step Verification On as a User
If the admin enables 2-Step Verification as optional, the user can manage it by going to Settings → General tab:
After hitting the "Turn on" button, a modal dialog will be shown, giving the user a few details about 2-Step Verification options.
If 2-Step Verification was enabled by the admin as mandatory, the below dialog will be displayed right after login.
If 2-Step Verification activation is optional, after clicking on the "+ Add" button next to an available method, the user will first be required to verify credentials. In this example, the “Authenticator App” has been chosen.
After entering the credentials, the QR code pairing screen is displayed.
Scanning the code with a TOTP authenticator app will generate an initial code, which the user needs to enter in the field for pairing.
After filling in the field and clicking the "Next" button, 2-Step Verification will be turned on, and the user can return to the WebMail interface.
For 2-Step Verification using the SMS method, learn more on how to configure SMS connectors.
How to Manage 2-Step Verification as a User
After activation, users will be able to revoke all existing devices or add additional devices for authentication from Settings → General tab → "2-Step Verification" configure button → clicking "Next" after the credentials verification:
If 2-Step Verification was set by the admin to be optional, turning the option off (by the admin or by the user) will disable the verification.
For the mandatory 2-Step Verification, users will be required to restart the initial configuration.
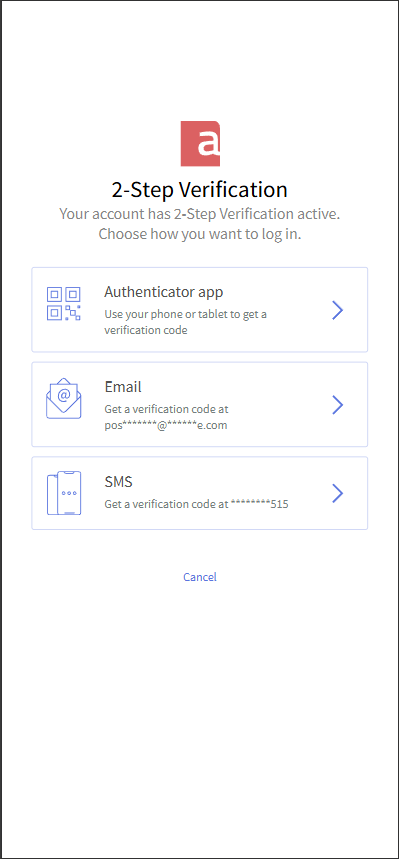
How to Authenticate Using 2-Step Verification
After activation, each future login (session expiry) will require 2-Step Verification, and you can choose what method you want to use to receive the code.
This screen can be branded via Axigen's Branding feature: Domains & Accounts → Manage Domains → click Edit on your domain → "General" Tab → "Branding" section → Configure branding.
2-Step Verification in the Mobile WebMail
The Mobile WebMail does not have any options to activate or manage 2-Step Verification.
However, once enabled from the desktop WebMail, Mobile WebMail logins will also require 2-Step Verification.