- Performing Axigen WebMail Single Sign-on
- Deep Linking Emails in Third Party Apps to Open in WebMail
- Integrating Zoom into the WebMail Calendar
- Integrating Microsoft Teams into the WebMail Calendar
- Configuring BIMI for Your Axigen WebMail: A Step-by-Step Guide
- Configuring SMS Connectors for 2-Step Verification and Account Recovery
Do you have a Customer Portal or Web application where your users usually sign in?
Here's how you can perform single sign-on in the backend so that you also authenticate them in your Axigen WebMail.
This article assumes that your application can access your Axigen users' credentials and pass them further to the WebMail application.
This article involves performing HTTP calls for authentication. To ensure proper security, please make sure that the calls are triggered via SSL.
- 1. Account Provisioning
- 2. Performing the Single Sign-on
- 2.1. The Customer Portal and the WebMail Share the Same Domain
- 2.2. The Customer Portal and the WebMail Use Different Domains
- 3. WebMail Session Keep-alive
- 4. Signing Out
- 5. Password Synchronization (Change / Reset)
1. Account Provisioning
Before implementing the single sign-on, you will need to manage the account provisioning. This is typically handled using Axigen's CLI API.
When provisioning the accounts in Axigen, please make sure that the accounts use the same login credentials used for the portal.
2. Performing the Single Sign-on
For performing single sign-on, there are three main actors involved:
-
The client (user's Web browser)
-
Your Customer Portal
-
Your Axigen WebMail
Depending on your setup, we will further split the single sign-on part into two different scenarios:
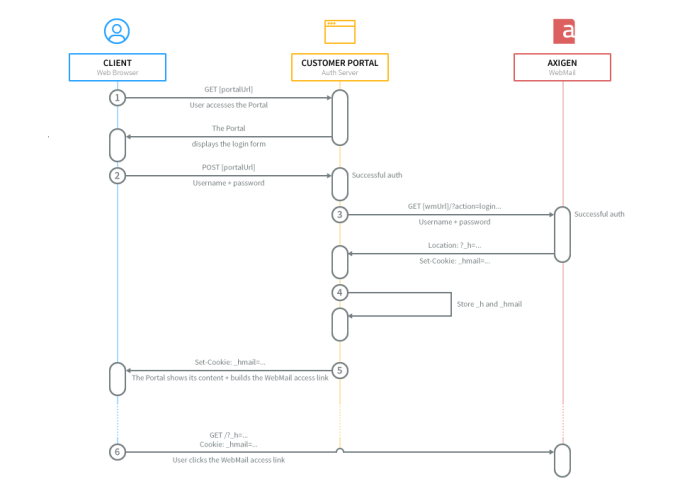
2.1. The Customer Portal and the WebMail Share the Same Domain
In this scenario, at least one of the two applications uses a subdomain, but they both have the same domain. Setups covered by this scenario:
-
The Portal uses the domain, the WebMail uses a subdomain
-
Portal URL:
example.com -
WebMail URL:
webmail.example.com
-
-
The Portal and WebMail use their own dedicated subdomain
-
Portal URL:
portal.example.com -
WebMail URL:
webmail.example.com
-
-
The Portal uses a subdomain, The WebMail uses the domain
-
Portal URL:
portal.example.com -
WebMail URL:
example.com
-
2.1.1. Authenticate in the WebMail from Your Portal
When the portal authentication is performed, an Axigen WebMail authentication should be triggered in the back-end (using sockets).
An authentication request (to Axigen WebMail) should look like:
If the last parameter: custom=ajax is missed, then the login will be executed in the Standard WebMail Interface.
2.1.2. Fetch and Store the Axigen Authentication Keys
If both Portal authentication and WebMail authentication succeed, the newly created Portal session should contain two properties, corresponding to the two authentication keys Axigen generated (these should be stored for later usage).
The result of a successful Axigen authentication request would look like:
Observe the two keys, one is the cookie key, the other is the URL key. The cookie key should also be presented to the user by means of a Set-Cookie header in the current response.
2.1.3. Build the Redirect to Axigen link
The actual redirection of the user's browser from the Portal context to the WebMail context is performed by means of a link that should contain the URL key:
This link assumes the cookie key retrieved from the initial Axigen auth request has already been presented to the browser by means of a Set-Cookie key.
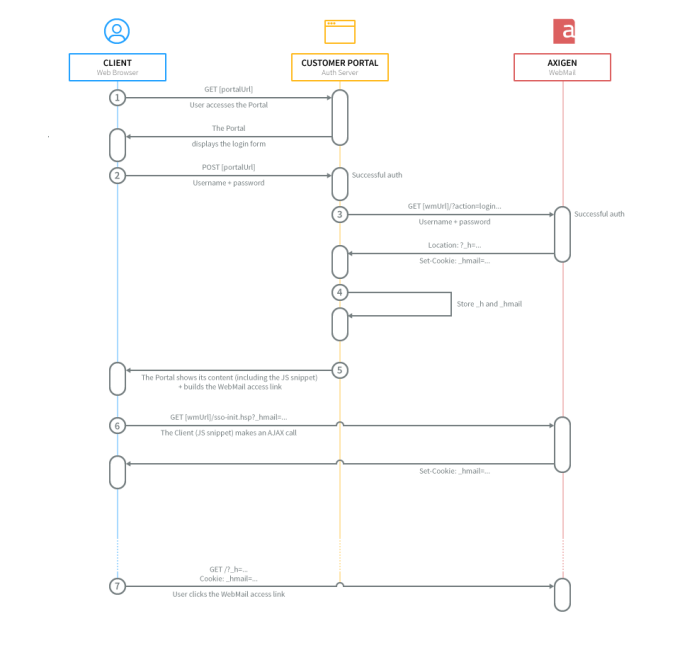
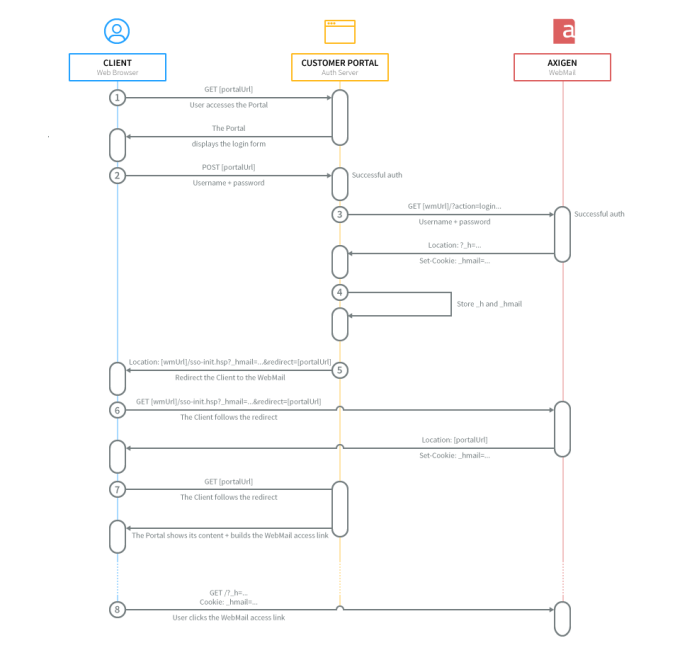
2.2. The Customer Portal and the WebMail Use Different Domains
To simplify the implementation of the examples below, starting with Axigen 10.3.1.19, you will find the sso-init.hsp script and a sample PHP implementation in the sso folder of your webmail that comes with the Axigen distribution.
In this scenario, each of the application uses its own different domain (or subdomain). Setups covered by this scenario:
-
The Portal uses its own domain, the WebMail uses its own domain:
-
Portal URL:
portal.com -
WebMail URL:
webmail.com
-
-
The Portal uses its own domain, the WebMail uses a subdomain under a different domain:
-
Portal URL:
portal.com -
WebMail URL:
webmail.example.com
-
-
The Portal uses a subdomain under its own domain, the WebMail its own domain:
-
Portal URL:
portal.test.com -
WebMail URL:
webmail.com
-
-
The Portal uses a subdomain under its own domain, the WebMail uses a subdomain under a different domain:
-
Portal URL:
portal.test.com -
WebMail URL:
webmail.example.com
-
2.2.1. Authenticate in the WebMail from Your Portal
When the portal authentication is performed, an Axigen WebMail authentication should be triggered in the back-end (using sockets).
An authentication request (to Axigen WebMail) should look like:
2.2.2. Fetch and Store the Axigen Authentication Keys
If both Portal authentication and WebMail authentication succeed, the newly created Portal session should contain two properties, corresponding to the two authentication keys Axigen generated (these should be stored for later usage).
The result of a successful Axigen authentication request would look like:
Observe the two keys, one is the cookie key, the other is the URL key.
2.2.3. Single Sign-on Using an Ajax Call (Recommended)
2.2.3.1. Build the Redirect to Axigen Link
The actual redirection of the user's browser from the Portal context to the WebMail context is performed by means of a link that should contain the URL key:
2.2.3.2. Set the Cookie via the WebMail Using an AJAX Call
Here's a snippet of how your AJAX call would look like:
And here's a sample response:
The sso-init.hsp script will present the cookie key to the browser by means of a Set-Cookie key.
2.2.4. Single Sign-on Using a Redirect
2.2.4.1. Redirect the Client to the WebMail and Back to the Portal
This step is necessary as the cookie can only be set from the WebMail domain.
The sso-init.hsp script will present the cookie key to the browser by means of a Set-Cookie key and then redirect back to the portal.
The Client follows the redirect and then gets redirected back to the portal:
2.2.4.2. Build the Redirect to Axigen Link
The actual redirection of the user's browser from the Portal context to the WebMail context is performed by means of a link that should contain the URL key:
3. WebMail Session Keep-alive
The Axigen Sessions expire if they are not refreshed periodically. The portal must do that by calling, for each stored active session (see the Fetch and store the Axigen authentication keys section above), periodically:
This request should be performed in the back-end (socket) and should be linked with every authenticated request for one of the Portal's pages.
4. Signing Out
Should you want to also sign out from the WebMail when the user signs out from the Portal, this can be done though a request similar to the one below:
5. Password Synchronization (Change / Reset)
This SSO approach requires that, for an account, the portal password and Axigen password are in sync. To avoid desynchronization, a separate process must be implemented to handle the password change / reset process in a single place (i.e. your portal).
This means that:
-
users will change / reset their password in your portal, and with each such operation the portal will also propagate the new password into Axigen.
-
you will need to disable the password change in Axigen.
You can hide the password change context in WebMail from private/config_settings.hsp in your webmail folder:


