- Hardware & Software Requirements
- DNS Prerequisites
- Installing Axigen on Linux
- Installing Axigen on Linux (Axigen X2 & X3)
- Installing Axigen on Windows
- Deploying & Running Axigen in VMware & VirtualBox
- Deploying & Running Axigen in Docker
- Performing the Initial Configuration (Onboarding)
- Starting / Stopping / Restarting Axigen
- About Axigen's Architecture
- Services and Modules
- Supported OS / Platforms and Web Clients
This Configuration Wizard is available up to Axigen X2 Update 2 (10.2.2). Starting with Axigen X3, the initial configuration is performed in your Web browser.
In order to enhance, simplify and render the initial setup automatic, Axigen includes a Configuration Wizard for Microsoft Windows. In a few easy steps, the wizard enables you to instantly set the administrator password, configure the primary domain and select the active services for the Axigen server.
The Axigen Configuration Wizard is provided as part of all the current Axigen installation packages, available for download on the Axigen website.
The wizard should be executed only once when a fresh install of the server is performed.
-
Launching the Axigen Configuration Wizard

-
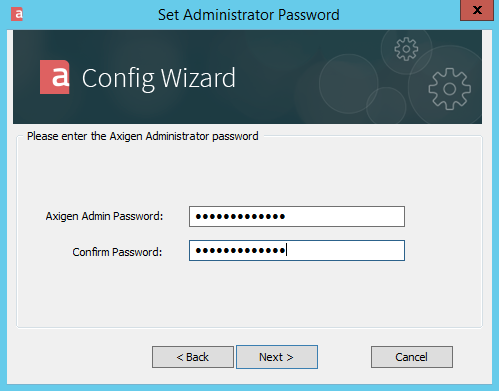
Configuring the admin password
After starting the Axigen Configuration Wizard, the first step you are prompted to take is to specify the admin password. The password is mandatory, therefore you must type one in and confirm it.
-
Configuring your primary domain
The next stage of running the wizard consists in configuring Axigen’s primary domain. The wizard will automatically detect the machine’s FQDN (Fully Qualified Domain Name) and based on it will propose the domain name as primary. If no domain can be detected, the default "localdomain" will be displayed. You can edit the fields of this tab at any time.
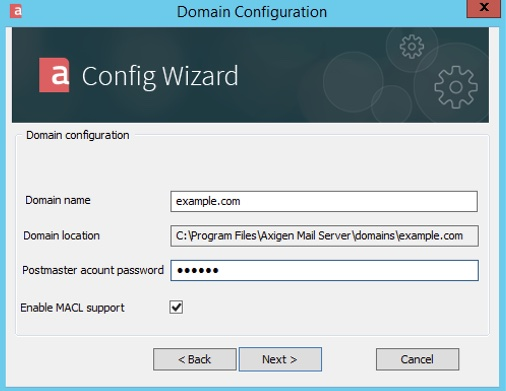
In the "Domain name" field, the wizard will display the automatically detected domain. Use the "Domain Location" field to edit the default storage path for the primary domain,
C:\Program Files\Axigen Mail Server\domains. To configure the primary domain password for the account postmaster, use the "Postmaster account password" field. -
Alias configuration
When running the wizard, this step allows you to select the alias they would like to configure for the primary domain defined at the previous step. There are two available options:
-
Add the "localhost" alias to this domain
-
Add the "localhost.localdomain" alias to this domain
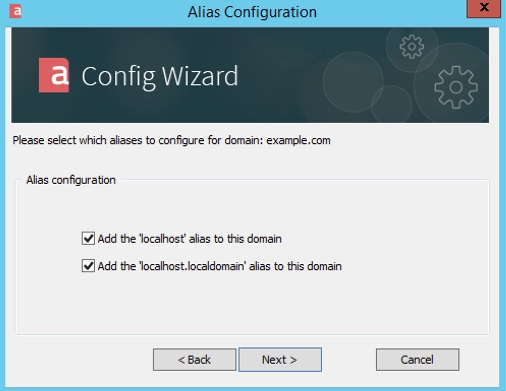
Check the box in front of the option you want to enable and then left-click on "Enter" to proceed to the next configuration step.
-
-
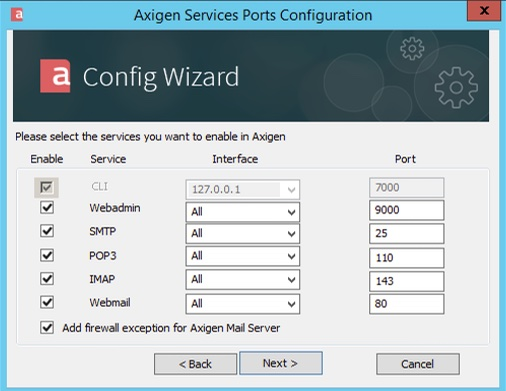
WebAdmin services selection
The fifth step of the automatic configuration process allows you to select the active common services for the Axigen server, as well as the listening interfaces and ports for each of them.
The "Add firewall exception for Axigen Mail Server" option will add Axigen as an exception in the Windows Firewall.
-
Configuring relay policies
The Axigen Configuration Wizard will then prompt you to select the networks allowed to relay emails through the Axigen server without prior authentication. Check or uncheck the box in front of the option you want to enable, respectively disable.
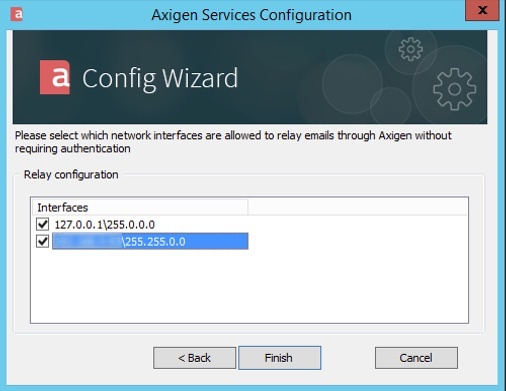
To finish the configuration process, left-click on the "Finish" button.
-
Completing the Axigen Configuration Wizard
Within the last step of the configuration wizard, all settings made at the previous phases are now put into practice. The screen will first display the full list of configurations that need to be completed.
As each configuration is finished successfully, an "OK" accompanying a green icon will be displayed on the right side of the respective setting.
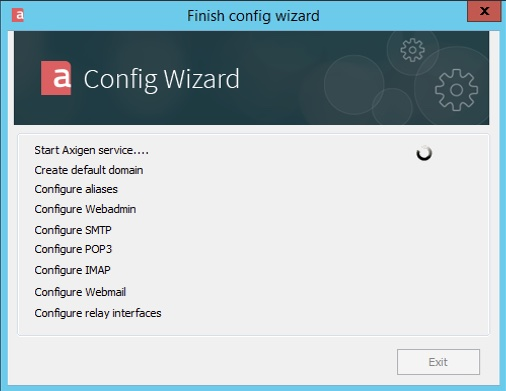
After completing the configurations, the wizard screen will also show the WebAdmin link and the "Exit" button will be highlighted. Left-click on "Exit" to close the Axigen Configuration Wizard.