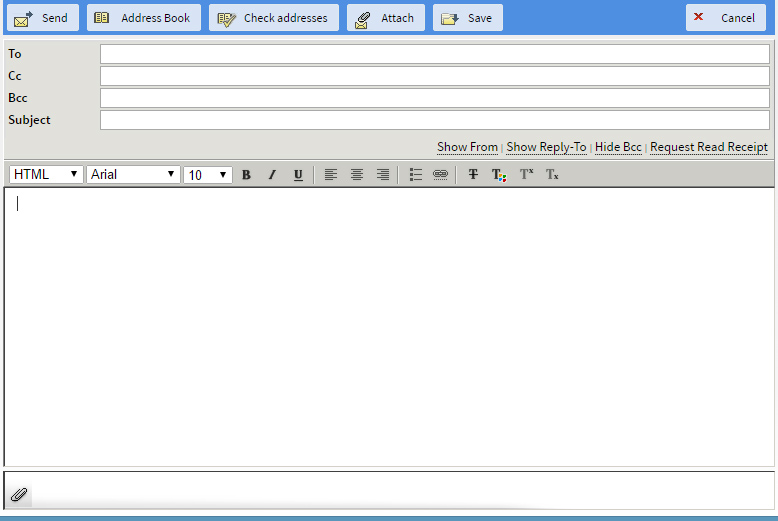
To compose a new message, press on the "New" button. A pop-up window similar to the one below will be displayed.
Adding addresses
Enter the email addresses of the recipients in the "To:" field of the message (separated by commas if multiple) or add them from your existing address book by pressing the "Address book" button.
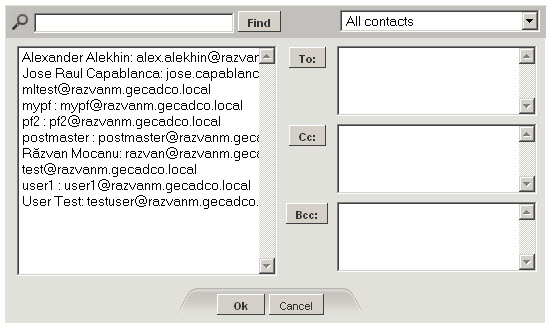
How to use the Address Book
The address book gives users access to the contacts defined for their account and also to public and domain contacts. First select the needed contact list, then select a specific one. Email addresses can be added automatically to the "To", "Cc" or "Bcc" fields. To do so, click on the desired address to select it, then click the "To", "Cc" or "Bcc" button. Press the "OK" button when you are done adding recipients or the "Cancel" button to quit.
When you type an address in the "To","Cc" or "Bcc" field in the message composer window, the auto-complete function will show you a list of addresses in your address book that match the text you have entered. Therefore, you can select the correct address and press "Enter".
How to add a different "From" address
Use a different originating email address by clicking the "Show From" link (at the right of the formatting buttons) and typing the desired address in the "From" field.
This option works only if the user (your account) has the "Send Mail as" permission from the mailbox owner, or the chosen "From" address was previously set as an alias.
How to specify the "Reply-to" / "Bcc" address
To display the "Reply-to" and "Bcc" fields, click the related links in the message composer window. After the fields are displayed, you will have new links available to hide the "Reply-to" and "Bcc" fields.

When clicking the "Show Reply-To" link, a new field will be shown, containing the email address defined in the settings window (which the user can override). If no value was defined for this parameter in the "Settings" > "Personal Data" page, the input field will be empty.

Check all the addresses
Use the "Check addresses" button to verify the validity of the email addresses you have inserted.
Requesting a read receipt for a message
Click "Request Read Receipt" when composing a new message, so that when the email is received by your intended recipients, they are presented with an option to send a confirmation that they read that email.
You can toggle the "Request Read Receipt" check-box in the message window between the following settings:
- "Request Read Receipt";
- "No Read Receipt".

To configure the general behavior regarding the request of read receipts, set the value for the "Settings" -> "Webmail Data" -> "Preferences" section -> "Request read receipt" option to match your required default behavior.
Filling the subject and the body
Specify the subject of your message in the "Subject:" field.
Edit your message in the message body area. First choose the desired format for the message: "HTML" or "Text".
Composing HTML messages
When composing an HTML formatted message you can use rich text (bold, italic, underline / strike-through, different font faces and sizes, colors, subscript, superscript, links, bullets etc.). Set these options by clicking on the related icons, shown in the screenshot below.

If a signature was previously defined for your account, via "Webmail" -> "Settings" -> "Webmail Data" tab -> "Signature" section, then when composing an email, the signature content is automatically added at the bottom of the message.
Use the above "Settings" section to customize the default content of your signature.
Attaching files to the email
Add attachments to your message by pressing the "Attach" button from the main message composer menu. To add an attachment, press on "Browse", select the desired file and then press on the "Upload" link.

To add multiple attachments, repeat these actions as many times as you need.
After adding one or more attachments to your message, the attachment list is displayed in the lower part of the screen. You can delete the attachments one by one, by clicking on the corresponding "[delete]" link.

Sending the message or saving it to "Drafts"
You can save a draft of your current message at any time by pressing the "Save" button. This will save the message in the "Drafts" folder. To resume its editing at a later time, simply access the "Drafts" folder and double-click on the message.
After you are done composing your message, click the "Send" button from the top-right section of the message composer window.