The filter wizard accessible from the "Filters" page allows users to easily create a filtering system to manage their email flow. Moreover, automatic replies can be set for all or some of the received email messages.
When first accessing the "Filters" page, a list of the already defined filters is displayed. If no filter has been previously set, the list will be blank.
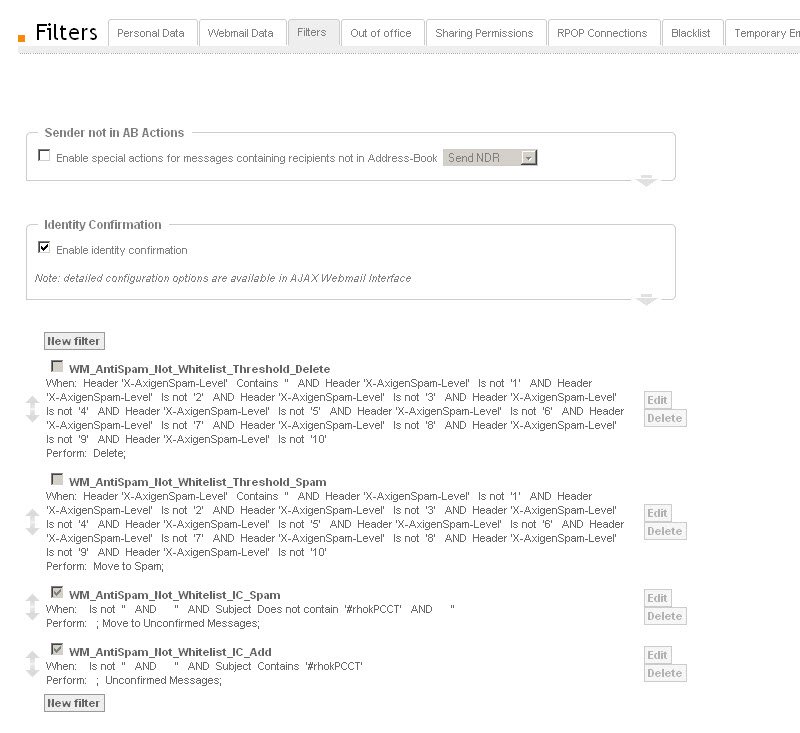
The "Sender not in AB Actions" allows you to apply certain actions to messages containing recipients that are not in the address book. To enable this option just check the box in front of it and choose either of the "Send NDR", "Move to Trash" or "Discard" options from the drop-down list.
Users can enable or disable "Identity Confirmation" filtering by checking the related box. Detailed configuration options for "Identity Confirmation" are only available in the Ajax WebMail interface.
As part of the "Identity Confirmation" filtering and the user level spam score filtering, a set of default filters will appear in the filter list, when the corresponding options are enabled. These are shown in the below screenshot.
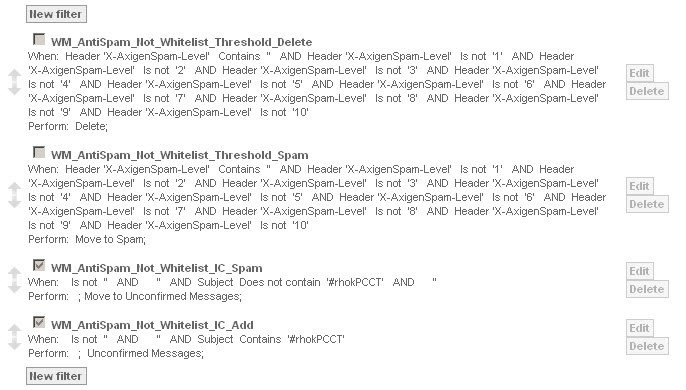
These filters cannot be deleted or edited. The settings for them should be only modified via the corresponding options from the Ajax WebMail interface.
Managing existing filters
To delete a filter, use the "Delete" button on the right of the respective filter. To edit an existing filter, press its corresponding "Edit" button.

To disable a filter without deleting it, un-check the box found at left of the filter name in the filter list or the box next to the "Enabled" entry, in the filter edit window.

Filters can be prioritized via the up / down arrows found in the left side of each filter entry from the filters list. The top-first filter has the highest priority. Once a message matches a rule, it will not be filtered using the other, lower priority, filters.
Sender not in AB Actions
The "Sender not in AB Actions" allows you to apply certain actions to messages containing recipients that are not in the address book. The available actions are:
- "Send NDR" - the email is discarded and a non-delivery report, detailing the refusal of the original email, will be returned to the sender;
- "Move to Trash" - the received message will be delivered to the "Trash" folder;
- "Discard" - the message will be completely removed (not present in any folder of your mailbox); the sender will not be notified regarding this action.

Identity Confirmation
Axigen's Identity Confirmation © service is basically a challenge / response anti-spam system designed to protect your Inbox from automated, unsolicited emails (SPAM).

Enable or disable "Identity Confirmation" filtering by checking the related box in the "Settings" -> "Filters" tab.
Identity Confirmation ensures that you only have valid messages in your Inbox, messages that have been "confirmed" to be from REAL and legitimate senders.
The algorithm to achieve this is very simple:
- A new person sends you an email message;
- When the email arrives:
- it is considered unconfirmed and consequently placed in the "Unconfirmed Messages" folder, rather than your Inbox;
- an instant reply message (confirmation request), containing an "identification key", is automatically generated towards the sender in question;
- the sender only needs to reply to the confirmation request, while leaving the subject intact, as it contains the "identification key".
- when this reply email from the sender arrives, his / her original email message is automatically moved from the "Unconfirmed messages" folder to your Inbox, and the response message is deleted.
Before you start using "Identity Confirmation", you might want to consider white-listing the email addresses from which you usually receive automated emails, (e.g. newsletters or email-enabled Internet groups), so that they are skipped by this anti-spam system. When "Identity Confirmation" is already enabled, you might also want to open the "Unconfirmed Messages" folder from time to time, just to check if you need to white-list any addresses that you may have missed before.
For more information on Identity Confirmation, please visit our dedicated site section.
Creating a new filter
Whether creating a new filter or editing an existing one, the options displayed are the same.
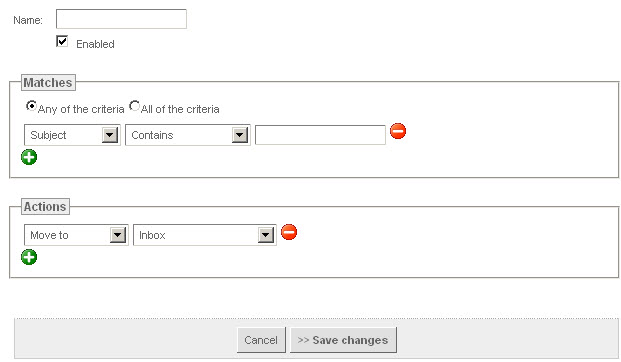
Use the "Name" text field to specify a name for the currently defined filter. You can further select, using the corresponding check-boxes, if the messages you want to filter should match all or any of the defined criteria.
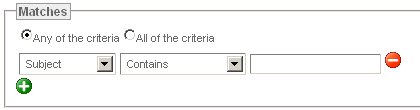
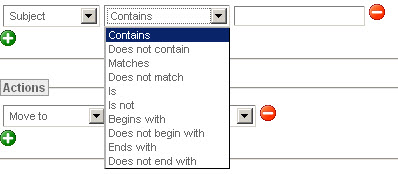
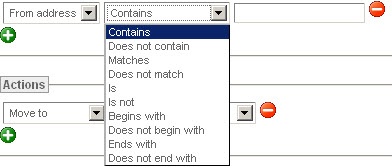
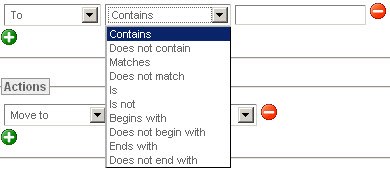
Next, use the drop-down menu to select what conditions the messages has to meet for the filter to apply. The available options are:
- "Subject" - the email's "Subject" field;
- "From" - the sender's email address;
- "To" - the recipients' addresses;
- "Cc" - the addresses found in the "Cc" header;

- "To" or "Cc" - matches addresses found both in the "To" and "Cc" headers;

- "Body" - the email content;

- "Size" - the email message size;

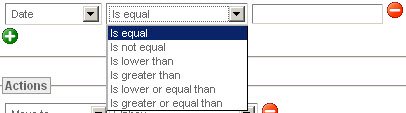
- "Date" - the received date of the email message;
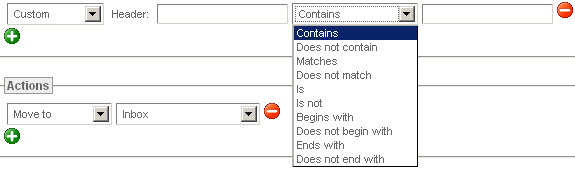
- "Custom" - match other custom defined headers; for the Custom option you can enter the desired header name and choose the compare option and content.
Finally, use the "Actions" area to define the actions to be taken (i.e. moving, copying, deleting, or redirecting it to a certain email address etc.) for email messages that match the specified criteria.
Check the green "+" icon in the "Actions" area to add a new action;
Click the red "forbidden" icon at the right of an already existing action to remove it.
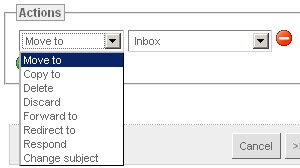
The available actions are:
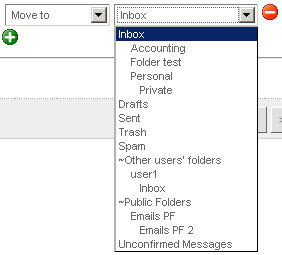
- "Move to" / "Copy to" - display an additional drop-down box, which allows you to choose the destination folder for messages that match the conditions of the filter;
- "Delete" - the messages that match the filter conditions will be delivered to the "Trash" folder;
- "Discard" - the messages that match the filter conditions will be rejected; no refusal (NDR) message will be returned to the sender;
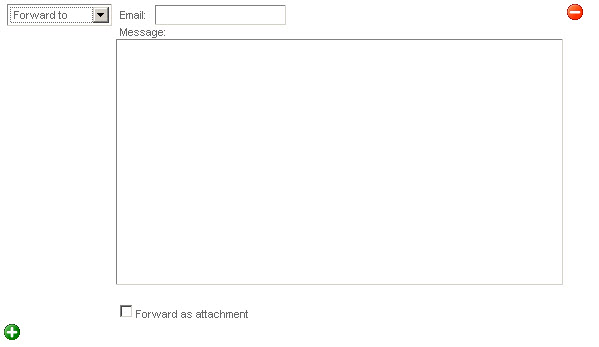
- "Forward to" - allows you to set the destination address for the forwarded message and the email content that will be added to the original message, as well as to and choose if the original message will be forwarded in-line or as an attachment; to do this, check the box related to the "Forward as attachment" option;
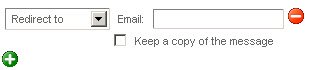
- "Redirect to" - allows you to choose the destination email address where the message will be relayed, as well as to keep a local copy of the original email, by checking the related box.
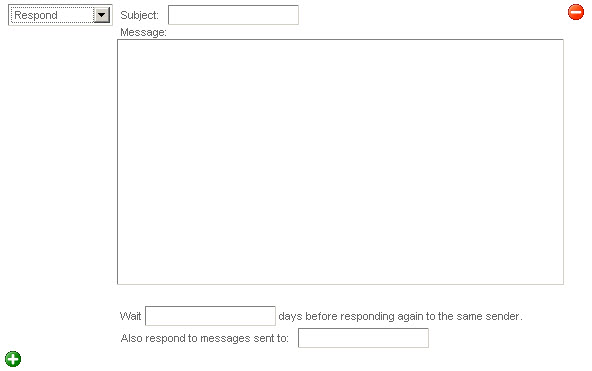
- "Respond" - an automatic reply will be sent to the email messages matching the defined filter; use the "Subject" and "Message" fields to define the subject and body of the email response to be sent. You can also set the "Days between subsequent responses" option and the "Also respond to messages sent to" options (this setting will use the same responder for other recipient addresses you may have) by editing their corresponding fields; an example of these settings is presented in the next screenshot.
- "Change subject" - allows you to append or prepend a text to the original email subject.

When you are done configuring the filter, press the "Save changes" button.