The Standard Webmail interface is structured to allow quick access to the most common user actions.
In the left column, you will find:
- A "Check email" button, which you can use to force the update of both the folder tree and the email message list with any new messages that are received.
- A search field, which allows you to search through the existing email messages stored in your account by using either the quick search option or, for more search criteria, the advanced search option.
- A folder tree, which contains all the folders you have the permission to work with, regardless of their type (email folders, calendar folders etc.) or ownership (your own folders, public folders, other users' folders).
- A mini calendar, expandable via the arrow button, which allows you to open your calendar (day view) to view or edit your appointments; this can be achieved by simply clicking on a specific day.
- The currently used space, calculated as percentage of the maximum allowed mailbox size.
The top-right corner of the Standard Webmail contains:
- Your account name.
- A "Settings" link, which you can use to access the user account configuration options.
- A "Logout" link.

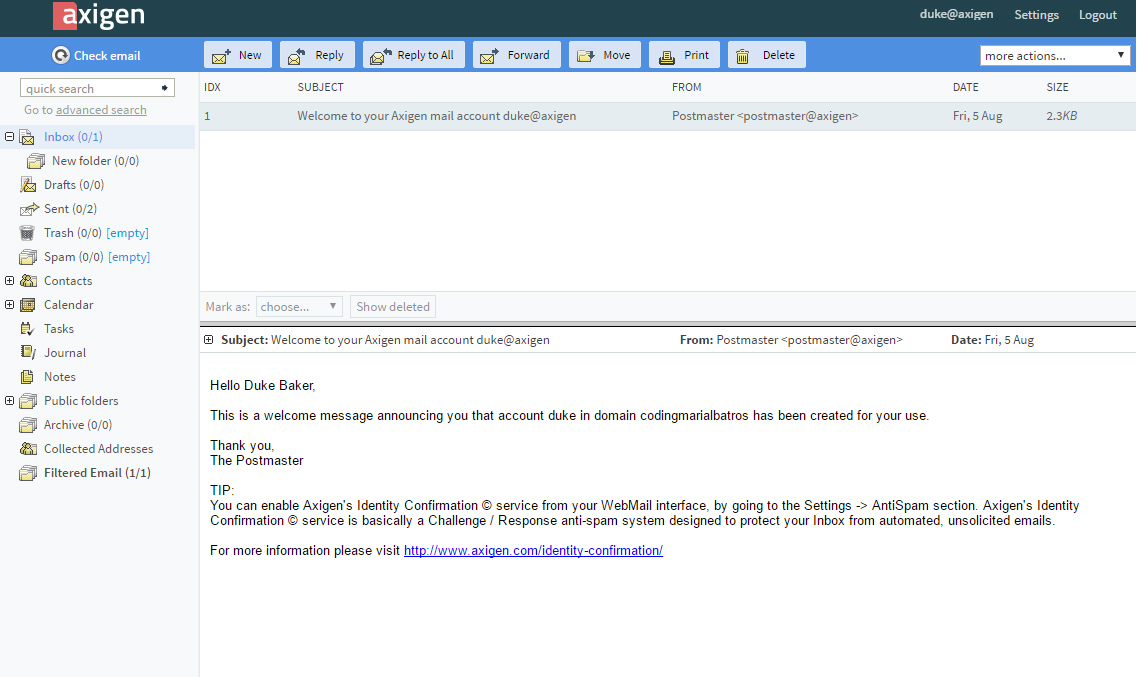
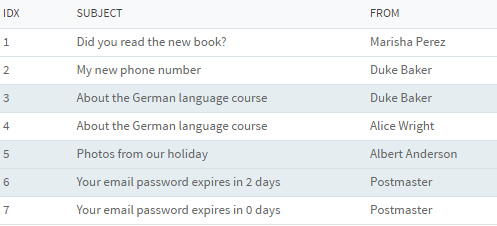
The main / central column of the Standard Webmail is used to display the content of the selected folder (e.g. an appointment list, if a calendar folder is selected, an email message list if an email folder is selected). Each view contains specific buttons that perform actions according to the type of view displayed. An example for an email folder view is shown in the screenshot below.
Folders structure
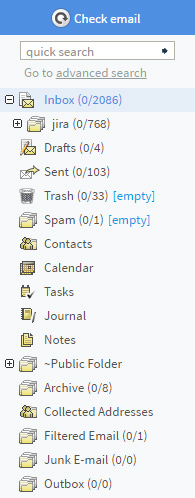
The left column of your WebMail account displays a tree structure which contains the folders the currently exist in your account. When first accessing your account via the Standard WebMail, the structure looks like this:

The folder tree helps you browse and manage the items in your account. As you can observe in the above screenshot, each folder type has a specific associated icon.
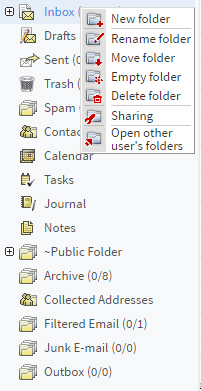
You can right-click on a folder in the tree view to view the operations you can perform on that folder.
Browsing through pages
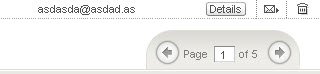
When you have a high number of messages displayed on separate pages in the email list view, you can browse through them with the help of the page navigation buttons (go to first, next, previous, last, or specific (by number) page) above the preview pane.

For example, if you have a large number of contacts in a specific contacts folder type, you can scroll down in each contact list page and then use the previous button, page number or the next button to browse through all the contacts.
Selecting items
When you wish to select several items (messages, contacts, tasks or notes), you can use the following keyboard shortcuts:
Ctrl + left-click - for multiple item selection, one item at a time; generally used to select non-adjacent items;
Shift + left-click - for multiple item selection; select the first item in the list and then click on a second item to select both items and ALL of the items in between.
Generally, for the selected items, you should only use the Copy / Move / Delete actions. If you select multiple messages and click forward or reply, these actions will only be applied for the last selected message.
Previewing messages
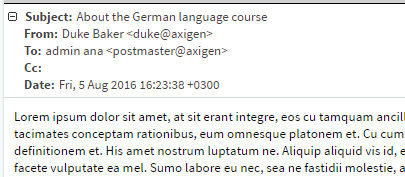
When selecting an email, the message body will be displayed in the preview pane, below the email list. By default, the preview pane displays horizontally the sender, recipient(s) and date details of the email. To have them displayed vertically, press the "+" icon in front of the Subject line, as shown in the picture below.
In the lower part of the preview pane, you can click the "View Source" button to open the full source of the selected email, including its headers and body, in a new tab. Click the "Block sender" button to add the sender of the selected message to your account-level blacklist.

Searching items
You can search through the email messages stored in your account by using the quick search or the advanced search option.
Below the "Check email" button you can find the "quick search" text box. Use this to enter the desired search pattern and click the arrow button to start the search. For more advanced search options, click the "Go to advanced search" link or access the "more actions..." menu (under the "Settings" and "Logout" links) and choose the "Advanced Search" option.

The quick search results will be displayed in the same window and can be sorted by any of the fields displayed in the message list header ("From", "To", "Subject", "Date", "Size").
Using the advanced search (for messages)
When accessing the advanced search window, choose whether the query should match all or any criteria of the specified search elements. Add as many search criteria as you need by clicking the "add new element" link or delete them by hitting their corresponding trash bin shaped button.
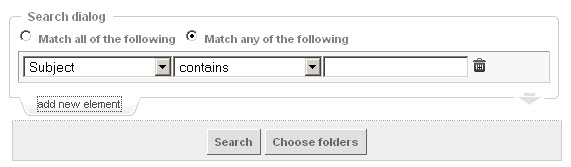
The full list of the criteria available for advanced search:
- "Subject" - email's subject field

Options: "Contains"; "Does not contain";
- "From" - sender's email address

Options: "Contains"; "Does not contain";
- "Body" - the email content

Options: "Contains"; "Does not contain";
- "Date" - the date the email was received

Options: "Before"; "On"; "Since";
- "Sent Date" - the date the email was sent

Options: "Before"; "On"; "Since";
- "To" - recipients' email address

Options: "Contains"; "Does not contain";
- "Cc" - the addresses found in the Cc header

Options: "Contains"; "Does not contain";
- "Size" - the email message size

Options: "Larger"; "Smaller". Enter the size value in the related text box and select the measurement unit from the next drop-down box - b (bytes), kb (kilobytes) or mb (megabytes);
- "Flag" - used to find messages that have a specific flag

Options: "deleted"; "seen"; "flagged" - according to the marking used by the Standard WebMail; after selecting the desired flag, you can choose from the next drop-down box "yes" or "no", meaning if the flag is applied or not (seen / unseen, deleted / not deleted, flagged / not flagged);
- "Header" - you can define the custom header name and content for which to search

Options: "Contains"; "Does not contain";
- "Headers and body" - searches all headers and email content for a specific term

Options: "Contains"; "Does not contain";
- "Attachment name" - used to search for emails containing attachments with a specific name

Options: "Contains"; "Does not contain";
- "Anywhere" - the entire email message content (all the above criteria)

Options: "Contains"; "Does not contain";
Use the drop-down menu to select the desired search element type.
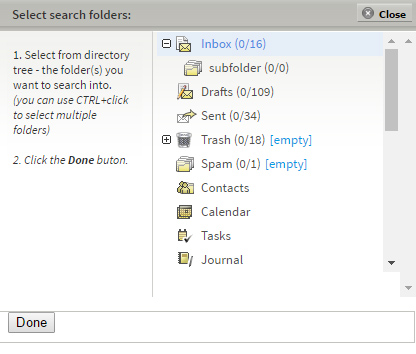
You can also establish the folders in which you want the search to be performed by clicking the "Choose folders" button and selecting them from the folder tree in the new window. Please note that public folders are not available. The folders you choose will be displayed in the "Selected folders" section. Finally, click the "Search" button to find the information you need.