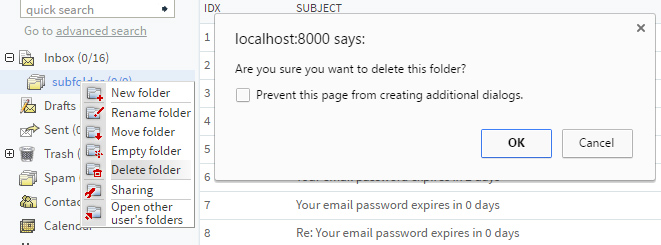
Right-click on any folder in the folder tree (be it personal, public or shared, mail, calendar, task, journal or notes) brings up a context menu with the following options: "New folder", "Rename folder", "Move folder", "Empty folder", "Delete folder", "Sharing", "Open (or Close) other user's folders".
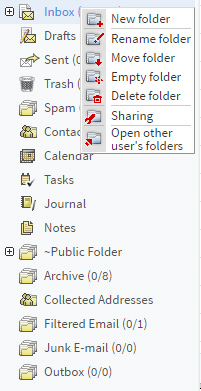
While these options always appear in the context menu, they might work or not, depending on the specific permissions set on the selected folders.
When clicking on any of these options, a new pop-up window is displayed, allowing you to make the desired changes.
New folder
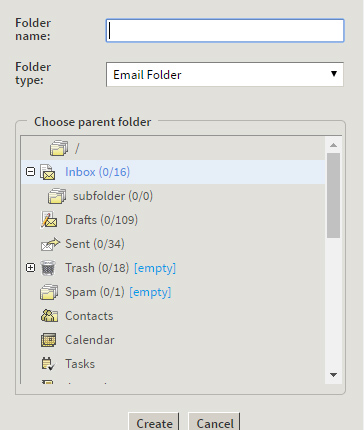
To create a new folder, right-click on a folder from the folder tree and select the "New Folder" option. A new window will be displayed, allowing you to specify the name of the new folder in the "Folder name" text area, the folder type ("Email", "Calendar", "Tasks", "Journal", "Notes" or "Contacts") and select its location in the folder tree. To finish, press the "Create" button or choose "Cancel" if you have changed your mind.
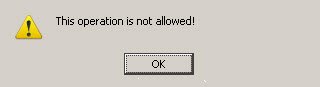
You cannot use the "~", "%" or "*" characters in the folder name. If a character that is not allowed is used in a folder's name, during the new folder creation process, a pop-up error will be displayed when attempting to create the folder, as shown below.
If you wish to add a new folder on the same tree level as the default folders ("Inbox", "Drafts" etc.) then select the "/" entry as the parent folder, as shown in the screenshot below.
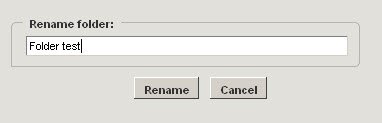
Rename folder
To rename a folder, right-click on it in the folder tree and select the "Rename folder" option. A new window will be displayed, allowing you to specify the new name of the folder.
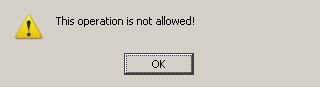
Renaming a public folder or other user's opened shared folders will succeed only if your user was granted the required permissions by the actual folder owner. Otherwise, an error message will be displayed, as depicted below.
Move folder
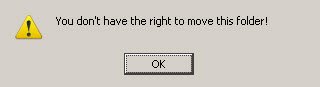
To move a folder, right-click on it from the folder tree and select the "Move folder" option. A new window will be displayed, allowing you to choose a new parent for the selected folder.

Moving a public folder or other user's opened shared folders will succeed only if your user was granted the required permissions by the actual folder owner. Otherwise, an error message will be displayed, as shown in the image below.
Empty / Delete folder
To remove the entire contents of a folder, right-click on the desired folder from the folder tree and select the "Empty folder" option.
To delete a folder, right-click on it from the folder tree and select the "Delete folder" option.
As a result of the delete action, the folder will be, by default, moved to Trash.
If the related "Settings" -> "Webmail Data" -> "Preferences" -> "Confirm empty folder" option is set to "Yes", then a pop-up will displayed asking for your confirmation when performing an empty / delete folder action.
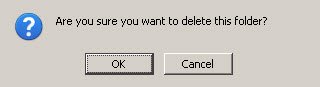
Emptying or deleting a public folder or other user's opened shared folders will succeed only if your user was granted the required permissions by the actual folder owner. Otherwise, an error message will displayed, as illustrated below.
Folder sharing
To control a folder's sharing permissions, go to the left folder tree, right-click on it and choose the "Sharing" option.

When accessing the "Sharing" options for a folder, a list of users / groups, for which the required permissions have been previously defined, is displayed. If no permission has been previously set the list will be blank.

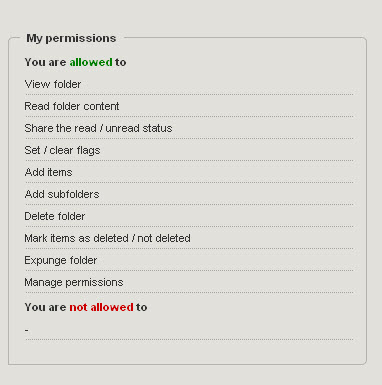
You can use the "My permissions" button to display your user's permissions for the selected folder. Below you can find an example of the default user permissions corresponding to the "Public contacts" folder.
Permissions act hierarchically (are inherited on the group hierarchy). Additionally, resource hierarchies (a folder being parent to another folder) also benefit from the inheritance algorithm. Check the "Apply these permissions to subfolders" box if you want sub-folders to inherit the permissions you set.

Managing existing permissions
To edit an existing set of permissions for a specific user, click the corresponding "Edit" button. To delete it hit the recycle bin shaped Delete button.
When editing each permission, it may be allowed explicitly, denied explicitly or not specified. In the "Effective Permissions" tab, you will be able to see what individual permissions are specifically allowed or not.
Effective permissions are displayed only for already saved permissions, so any changes won't be reflected until saving.
The "Effective Permissions" tab will only display the relevant permissions after you select a user / group and it will only show updated permissions after you save your settings.
If a permission is not explicitly allowed or denied for a sub-folder, then the permission setting will be inherited from the first superior folder which has the "Apply these permissions to subfolders" option enabled.
Adding permissions to more users
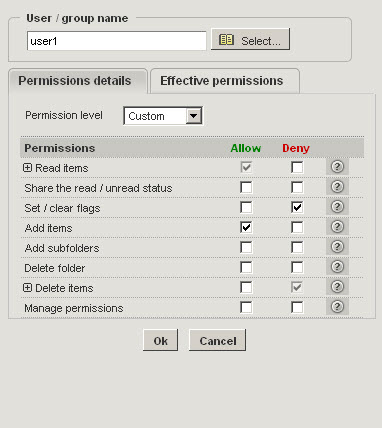
Click the "Add" button to add permissions for a specific a user or a group of users.

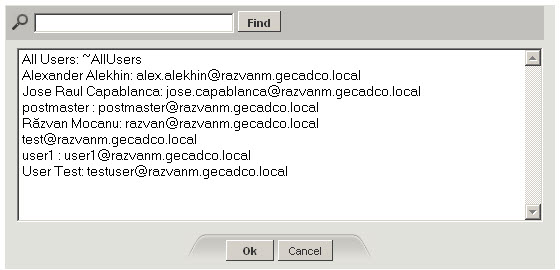
In the "User / group name" section, enter the desired account name you wish to set sharing permissions for. The "Select" button can be used to search the address book for accounts or groups.
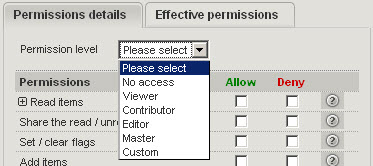
You can set a predefined permission level via the "Permissions details" section. There are 6 levels to choose from:
- "No access" - all permissions are denied;
- "Viewer" - viewing the folder and reading its content are allowed;
- "Contributor" - viewing the folder, reading its content and adding items are allowed;
- "Editor" - viewing the folder, reading its content, setting / clearing flags, adding items, marking items as deleted / not deleted and expunging items are allowed;
- "Master" - all permissions are allowed;
- "Custom" - each permission can be defined individually according to your needs.
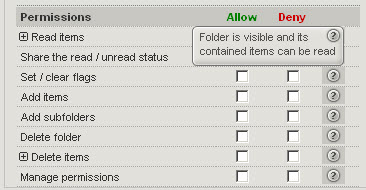
Click on the question mark next to each explicit permission to display a short description for it.
- "Viewer" level - means the selected user / group is allowed to:
- View folder;
- Read folder content.
- "Contributor" level - means the selected user / group is allowed to:
- View folder;
- Read folder content;
- Add items.
- "Editor" level - means the selected user / group is allowed to:
- View folder;
- Read folder content;
- Add items;
- Set / clear flags;
- Mark items as deleted / not deleted;
- Expunge folder.
- "Master" level - means the selected user / group is allowed to:
- View folder;
- Read folder content;
- Add items;
- Set / clear flags;
- Mark items as deleted / not deleted;
- Expunge folder;
- Share the read / unread status;
- Add sub-folders;
- Delete folder;
- Manage permissions.
When selecting one of the predefined levels, "Allow" check-box associated its corresponding permissions will be automatically marked.
The "Read items" and "Delete items" permissions include related sub-permissions:
- The "Read items" permission allows a user to view the folder and read its content; you can see the "Read items" sub-permissions by clicking the "+" button;

- The "Delete items" permission allows the user to mark items as deleted / not deleted and permanently delete (expunge) the folder content; use the "+" button to see the "Delete items" sub-permissions.

In the "Effective permissions" tab, you will be able to see what permissions are specifically allowed or not.
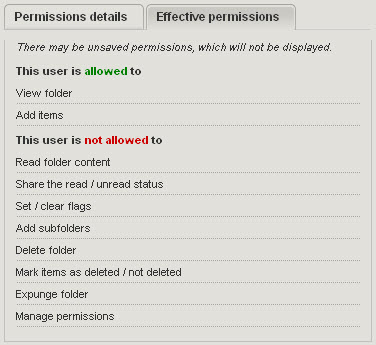
Effective permissions are displayed only for already saved permissions, so changes won't be reflected until saving.
The Effective Permissions tab will only display the relevant permissions after you select a user / group and it will only show updated permissions after you save your settings.
Open other user's folders
To open another user's shared folders (for which the user explicitly defined access permissions to your account), right-click on any folder in the folder tree and select "Open other user's folders". You can also subscribe via the "Settings" -> "Sharing Permissions" tab -> "Open other user's folders" section -> "Subscribe" button.
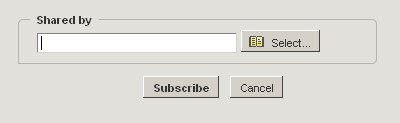
In the new window's "Shared by" section, you can either type the email address in the text field or click the "Select" button to choose it from the contacts list in your domain.
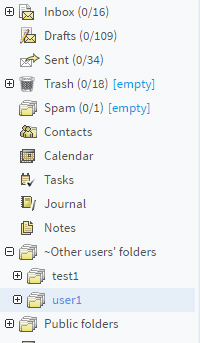
The folder will appear in the "Other users' folders" section of your folder tree, right above the "Public Folders":
If you do not wish to see the folders shared by a certain user anymore, close them by right-clicking on the folder displaying the user's name (or one of its sub-folders) and choosing the "Close" user option.