Active Directory Integration
The integration and configuration process that relates to the Active Directory is performed entirely using the Microsoft Management Console (MMC) and the add-in snap-in provided for this purpose as an extension. This snap-in application can be downloaded free of charge from the download page on Axigen's website.
Once the installation of the ".msi" (Microsoft Installer) package for the snap-in is complete, the integration process can begin and the configuration of the existing Active Directory accounts can be performed. Before any actions can be performed, the Axigen mail server has to be configured correctly to use the AD server for syncing purposes. For this reason, an LDAP connector must exist before the following procedure is executed. If the Axigen mail server is not correctly configured, the sync process will fail.
With the "Axigen AD extension" package installed, a new tab will appear in the "Properties" section of the domain accounts. This tab can be accessed whether the selected account has the Axigen extensions enabled or not. To activate the Axigen extensions you need to right-click the account and select the "Create Axigen Account" option. This tab contents, for an account that has the Axigen extension enabled, is depicted in the following screenshot:
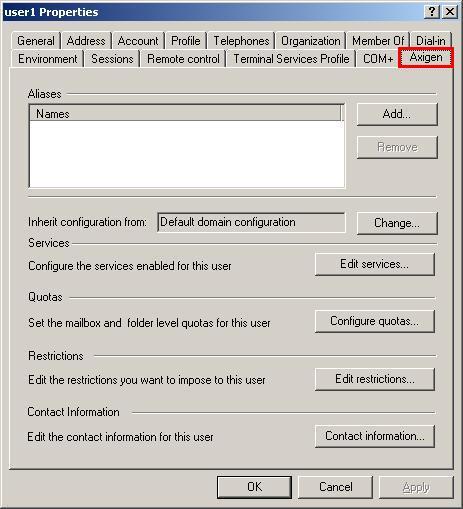
The options and configuration changes performed in this section apply exclusively to Axigen's configuration for this account. Service related changes and account information do not apply and are not inherited by the domain data of this account. Changing the contact information for this account (e.g. first name) will not change the "first name" attribute of this account in the Active Directory database.
All changes applied to the account in the Axigen section feature this behavior. This approach is used in order to prevent inconsistencies and conflicts that may occur by completely separating the Axigen data from the regular account properties.
Options and settings available while using the Active Directory add-in include:
-
Alias management - allows the addition, modification and removal of email account aliases. These aliases can be used during the login procedure and for email delivery purposes.
-
Configuration inheritance - allows the modification of the default (implicit) inheritance scheme (settings inherited from the domain level configuration).
-
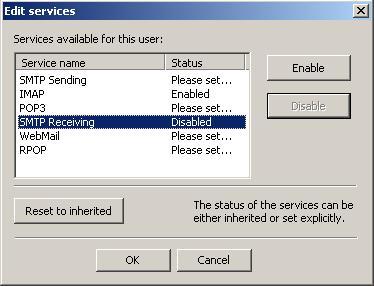
Service management - allows explicit definition of access levels for the email services, including SMTP, IMAP, POP3, WebMail and remote POP.
-
Quota management - allows the configuration of the maximum allowed storage space that can be used by the account. By default this setting is inherited from the domain level. The following screenshot depicts the available service-related options:
-
Restriction management - allows the explicit definition of certain restrictions related to password enforcement, email number, folder number etc. By default the settings here are inherited from the domain level.
-
Password - the password enforcement section allows the configuration of various rules that aim to increase the difficulty of password guessing. To change the default inherited options here, you need to click the "Set Explicit" button and the make the necessary modifications.
-
Sessions - allows the configuration of maximum concurrence values accepted per service for the respective account. To change the defaults you need to click the "Set Explicit" button next to the required option and make the changes.
-
WebMail - allows the configuration of attachment size and number as well as the maximum message size for WebMail generated messages. To change the defaults you need to click the "Set Explicit" button next to the required option and make the changes.
-
Body Filtering - this option applies to HTML message contents read through the WebMail interface. To change the defaults you need to click the "Set Explicit" button next to the required option and make the changes.
-
Message Sending - allows the setup of limitations on the number of messages delivered by the account in a certain time interval. To change the default inherited options here, you need to click the "Set Explicit" button and the make the necessary modifications.
-
Remote POP - allows the definition of a maximum number of RPOP accounts and the minimum RPOP polling time. To change the defaults you need to click the "Set Explicit" button next to the required option and make the changes.
-
Temporary Email - allows the activation or deactivation of this feature for the account, the number of addresses that can be created and the maximum expiry time for each of them. To change the defaults you need to click the "Set Explicit" button next to the required option and make the changes.
-
Send / Receive - these options limit the behavior of send or received emails by this account. To change the defaults you need to click the "Set Explicit" button next to the required option and make the changes.
-
-
Contact information management - allows the modification of the contact data for the account owner (first name, address, email address, phone number etc.). These settings can be changed by the account owner upon login in the WebMail interface, through the use of the "Settings" panel.
In order to gain access to these settings the Active Directory administrator needs to enable the Axigen configuration for each account. This process requires each account to be added the Axigen set of parameters and enabling the sync options for the account. To perform this step and activate the Axigen configuration for a user account in the Active Directory database, you need to open the "Domain Users and Computers" snap-in and right-click one of the user accounts. Within the right-click menu a new option will be available if the snap-in was installed correctly:
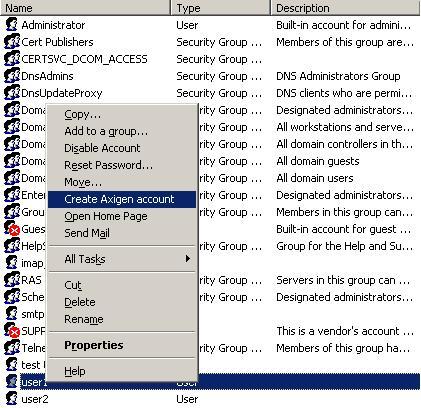
In order to remove the Axigen-related properties of the account the same process should be repeated, only instead of the "Create Axigen Account", the "Remove Axigen Account" option should be chosen.
Once the "Axigen Account" is appended to the Active Directory user, the sync for this account will be performed by the Axigen mail server on each lookup if modifications are detected. The sync process will take place in one direction or the other depending on the settings defined for the LDAP connector used to perform the sync.